BMW 7 Series: Stamping Vehicle Identification Number (Needle Stamping Unit)
Read and comply with GENERAL INFORMATION.
The needle stamping system 360 - VRM - BMW is required to stamp the vehicle identification number.
Order number: 81 43 2 155 736
- Sourcing reference: BMW Workshop Equipment Catalogue.
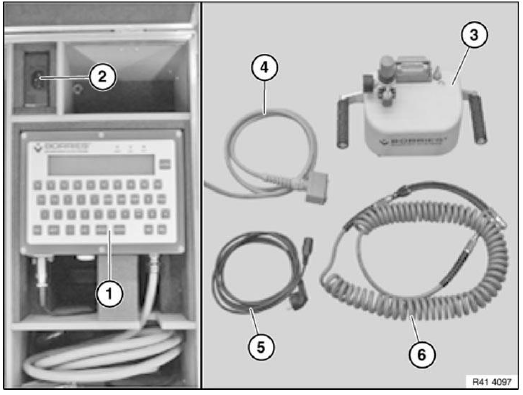
Fig. 243: Identifying Display, Mains Adapter, Needle Stamping Unit,
Connecting Cable And Power Cable
The needle stamping system 360 tool set comprises:
- Display
- Mains adapter
- Needle stamping unit
- Connecting cable
- Power cable
- Compressed-air hose
NOTE: A compressed-air connection is also required.
- Operating pressure approx. 4 bar
- Use only dried, oil-free air
Procedure for additional vehicle identification number
- Cross through original vehicle identification number.
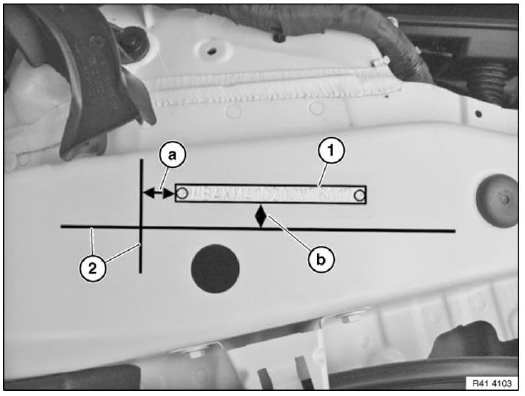
Fig. 244: Identifying Vehicle Identification Number Position
Remove ENGINE COMPARTMENT LID SEAL LOCATOR.
- Original vehicle identification number (line 1).
Mark position lines (2) in accordance with specified dimensions/measurements.
Measurement a = 12 mm
Measurement b = 10 mm
Display input:
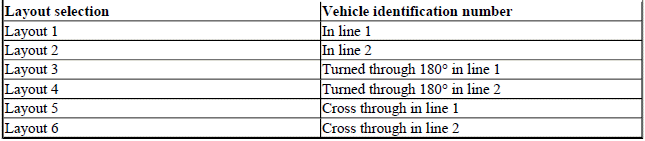
- Select Layout 5 with arrow button.
- Enter vehicle identification number with F10.
- Press "ENTER" button.
NOTE: With Layout 5 the vehicle identification number (line 1) is crossed through.

Fig. 245: Identifying Display
IMPORTANT: Perform stamping operation with position lines in advance on a test sheet.
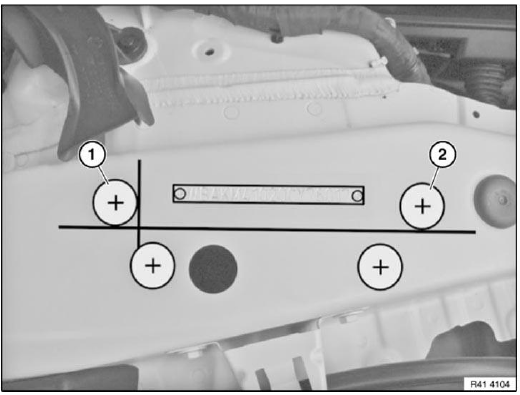
Fig. 246: Identifying Suction Feet Of Needle Stamping Unit Moving Position
Move suction feet of needle stamping unit to positions (1) and (2) shown.
- First adjust position (1)
- Then adjust position (2)
NOTE: Make sure the unit is resting securely in position. If necessary, adjust the height and position of the suction feet.
Press pushbutton (1) for vacuum pressure.
Then start stamping operation with pushbutton (2).
IMPORTANT: After completing the stamping operation, do not alter the position of the unit.
Do not switch off vacuum pressure.

Fig. 247: Stamping Vehicle Identification Number
Stamping second vehicle identification number
Display input:
- Select Layout 2 with arrow button.
- Press "ENTER" button.
NOTE: With Layout 2 the already entered vehicle identification number is stamped in line 2.
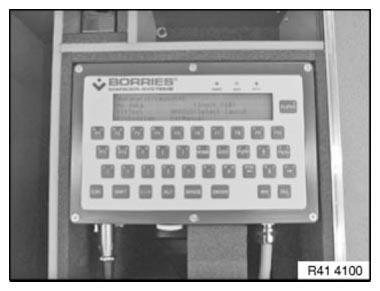
Fig. 248: Identifying Display
Start stamping operation with pushbutton (2).
After the stamping operation, if necessary adapt ENGINE COMPARTMENT LID SEAL LOCATOR of second vehicle identification number.
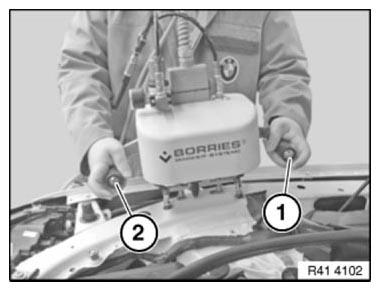
Fig. 249: Stamping Vehicle Identification Number
Following layout functions are available:
VEHICLE IDENTIFICATION NUMBER CHART

READ NEXT:
 Stripping Operations - Replacing Front Left Wheel Arch
NOTE: Owing to the different engine variants and equipment specifications,
not all the
components are taken into consideration.
The following list basically represents the removal sequence.
Disconn
Cover For Frame Side Member (Part Replacement Between A And B
Pillar)
Observe procedure for REPAIR STAGE 3.
Read contents of BODY, GENERAL.
Following new body parts are required:
B-pillar with entrance
Fig. 251: Identifying B-Pillar With Entrance
Fig. 252: Identi
SEE MORE:
Danger Of Poisoning If Oil Is Ingested/Absorbed Through The Skin
Danger of poisoning!
Ingesting oil or absorbing through the skin may cause poisoning!
Possible symptoms are:
Headaches
Dizziness
Stomach aches
Vomiting
Diarrhoea
Cramps/fits
Unconsciousness
Protective measures/rules of conduct
Pour oil only into appropriately marked containers
Do not pou
Removing Ball Pivot
NOTE: Remove gas spring, refer to REMOVING GAS SPRING.
NOTE: The following text describes how to remove the ball pivot from the
hinge
retaining bracket on the rear lid as an example. Proceed in the same way for the
other ball pivots.
Make sure the attachments are reinstalled in the correct sequenc
