BMW 7 Series: Replacing Rear Left Outer Wheel Arch Section (Rear Side Panel Removed)
Read contents of BODY, GENERAL.
Remove or cover those vehicle components in the repair area which are susceptible to heat or dust.
Use only approved SPOT-WELDING APPARATUS for repairs.
Following new body parts are required:
- Outer wheel arch section, rear
- Shaped part, entrance, outer (not shown)
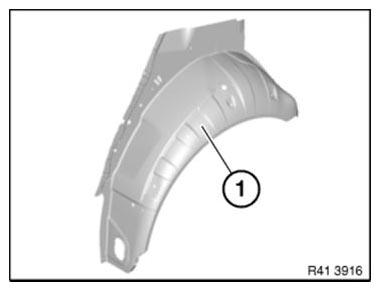
Fig. 236: Identifying Outer Wheel Arch Section, Rear
Removal of outer wheel arch section
Cut wheel arch along line (1).
REPLACE CAVITY SEALING (2).
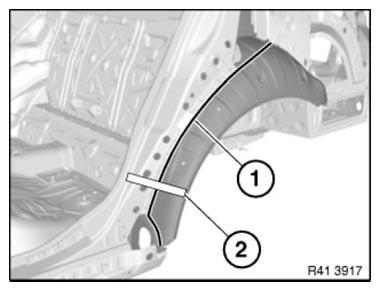
Fig. 237: Identifying Cavity Sealing And Wheel Arch Along Line
Cut wheel arch along line (1).
Remove section for outer wheel arch section.
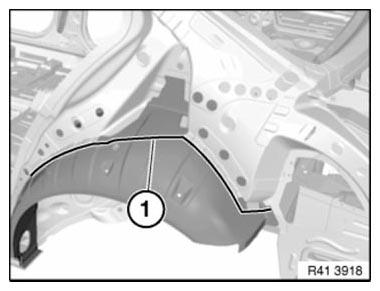
Fig. 238: Identifying Wheel Arch Along Line
Installation note: Fit new part from below and weld in area (1) to overlap.
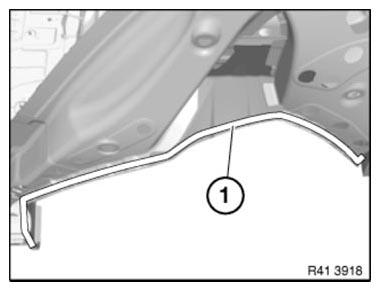
Fig. 239: Identifying New Part Weld Area
Preparation of new part
Mark new part in accordance with severance cut on vehicle + 20 mm extra material and cut.
Adjust new part in conjunction with side wall to fit.
Installation of outer wheel arch section
Install new part and weld.
REPLACING REAR RIGHT OUTER WHEEL ARCH SECTION (REAR SIDE PANEL REMOVED)
Read contents of BODY, GENERAL.
Spot-weld bonding is used on this vehicle. Observe specific PROCEDURE.
Remove or cover those vehicle components in the repair area which are susceptible to heat or dust.
Use only approved SPOT-WELDING APPARATUS for repairs.
Following new body parts are required:
- Outer wheel arch section, rear
- Shaped part, entrance, outer (not shown)
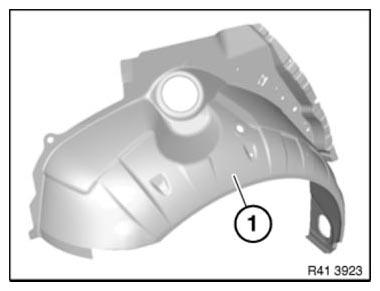
Fig. 240: Identifying Outer Wheel Arch Section, Rear
Removal of outer wheel arch section
Cut wheel arch along line (1).
REPLACE CAVITY SEALING (2).
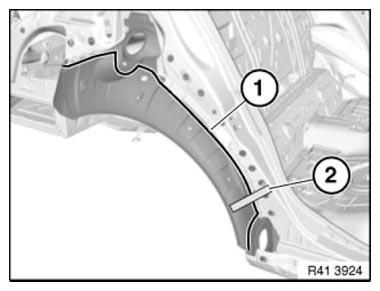
Fig. 241: Identifying Cavity Sealing And Wheel Arch Along Line
Cut wheel arch along line (1).
OPEN spot-welded adhesive joints in area (2).
IMPORTANT: Severance cut in area (3) not permitted!
Remove section for outer wheel arch section.
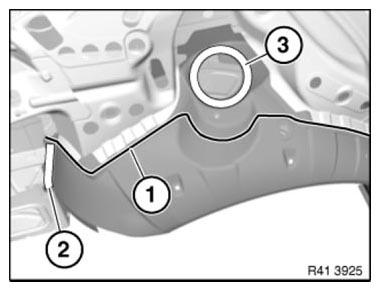
Fig. 242: Identifying Wheel Arch Along Line And Spot-Welded Adhesive Joints
Area
Preparation of new part
Mark new part in accordance with severance cut on vehicle + 20 mm extra material and cut.
Installation of outer wheel arch section
Fit new part from below and adjust to fit in conjunction with side wall.
Weld new part.
READ NEXT:
 Stamping Vehicle Identification Number (Needle Stamping Unit)
Read and comply with GENERAL INFORMATION.
The needle stamping system 360 - VRM - BMW is required to stamp the vehicle
identification number.
Order number: 81 43 2 155 736
Sourcing reference:
BMW
Stripping Operations - Replacing Front Left Wheel Arch
NOTE: Owing to the different engine variants and equipment specifications,
not all the
components are taken into consideration.
The following list basically represents the removal sequence.
Disconn
SEE MORE:
Throttle And Operation
REMOVING AND INSTALLING/SEALING LEFT THROTTLE VALVE ASSEMBLY (N63)
Necessary preliminary tasks
Switch off ignition.
Remove left INTERCOOLER.
Unlock plug (1) and remove.
Unfasten screws (2).
Tightening torque 13 54 1AZ.
Remove throttle valve assembly (3).
Installation:
Check plug connection (
External Audio Sources
DVD Changer
The 6-DVD changer is offered as part of the ZPS Premium Sound Package on the
F01/F02 and it is located
above the glove compartment behind the dashboard trim panel. A CD Changer is no
longer offered.
The DVD changer forms part of the MOST network.
A single-slot changer means that the
