BMW 7 Series: Replacing Luggage Compartment Floor, Left Section (Tail Panel Or Side Wall Removed)
Read contents of BODY, GENERAL.
STRIP DOWN VEHICLE
NOTE: Observe new procedure for bonding and riveting (REPAIR STAGE 2).
Following new body parts are required:
- Luggage compartment floor, left Following CONSUMABLES are required:
MATERIAL CHART

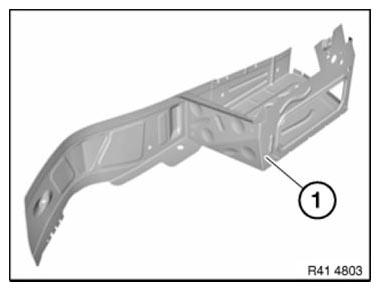
Fig. 170: Identifying Left Luggage Compartment Floor
Removal of luggage compartment floor
For purposes of clarity, graphic shows most of the tail panel removed.
Open welded connections in area (1).

Fig. 171: Identifying Welded Connections Area And Luggage Compartment Floor
Open welded connections in area (1).

Fig. 172: Identifying Welded Connections Area
Open welded connections in area (1).
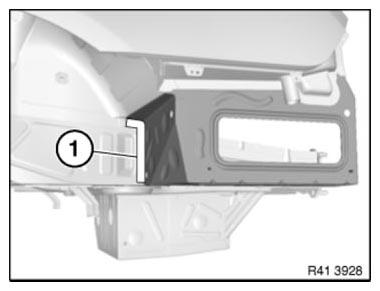
Fig. 173: Identifying Welded Connections Area
Separate welded connections in area (1) from inside.
Remove the luggage compartment floor.

Fig. 174: Identifying Welded Connections Area
New part preparation
Open welded connections in area (1).
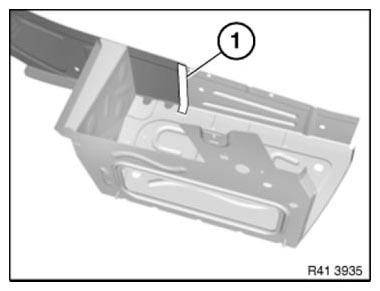
Fig. 175: Identifying Welded Connections Area
Open welded connections in area (1).
Remove metal section (2).
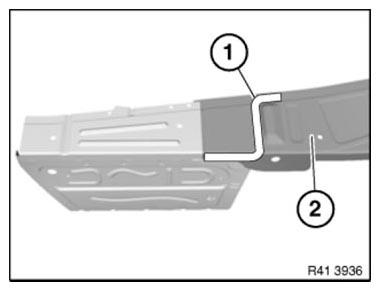
Fig. 176: Identifying Welded Connections Area And Metal Section
Adjust and secure the luggage compartment floor (1).
Set 5 4.2 mm dia. bore holes in area (2).
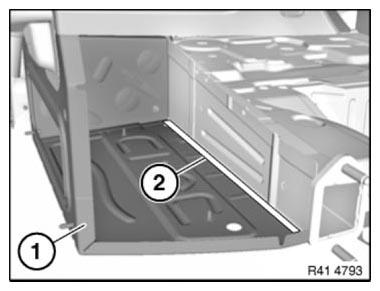
Fig. 177: Identifying Luggage Compartment Floor And Bore Holes Area
Set 3 4.2 mm dia. bore holes in area (1).

Fig. 178: Identifying Bore Holes Area
Set 11 4.2 mm dia. bore holes in area (1).
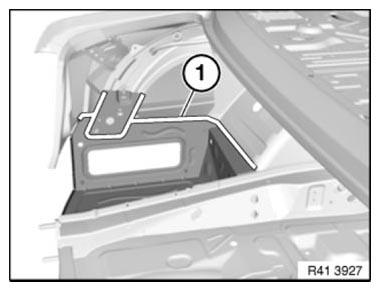
Fig. 179: Identifying Bore Holes Area
Set six 4.2 mm dia. bore holes in area (1).
Remove new parts and deburr bore holes.
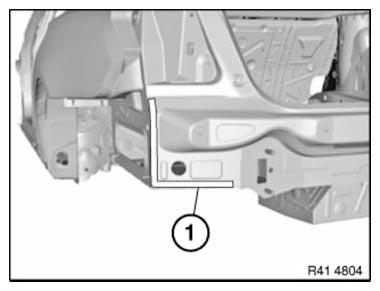
Fig. 180: Identifying Bore Holes Area
IMPORTANT: Do not grind new part and body in area of bonding surfaces.
Installation of luggage compartment floor
Clean all bonding surfaces on new part and on vehicle with cleaning agent R1.
Apply adhesive on all bonding and riveting surfaces.
Install new part and rivet with blind rivets.
When installing the new part, make sure that all bonding surfaces have sufficient adhesive.
READ NEXT:
 Replacing Rear Cross Member On Luggage Compartment Floor (Tail
Panel Removed)
Replacing Rear Cross Member On Luggage Compartment Floor (Tail
Panel Removed)
Read contents of BODY, GENERAL.
STRIP DOWN VEHICLE
Observe new procedure for bonding and riveting (REPAIR STAGE 2).
Following new body parts are required:
End of luggage compartment floor Following
Carrying Over Hole Pattern
When replacing a body component, it is necessary to carry over the hole
pattern from the existing body to the
new component.
The following pictures are a schematic representation of carrying over th
SEE MORE:
Removing And Installing/Replacing Gearbox Oil Cooler For
Automatic Transmission (N63, N74)
IMPORTANT: Risk of scalding!
Only perform this repair work after engine has cooled down.
Necessary preliminary work
Drain COOLANT.
Remove FAN COWL.
Recycling
Catch and dispose of drained coolant in a suitable container.
Transmission oil emerges when engine oil lines are detached from transmissi
If equipped with Equipment
Stop Assistant
Concept
If the driver is no longer fit to drive, the system
helps to safely bring the vehicle to a standstill.
General information
The emergency stop function is not triggered
automatically. The emergency stop function can
only be triggered manually by the occupants.
When the system is activated, t
