BMW 7 Series: Removing And Installing/Replacing Feed And Return Lines For Engine Oil Cooler (N63)
WARNING: Risk of scalding! Only perform this repair work after engine has cooled down.
IMPORTANT: Wear protective gloves and safety goggles.
IMPORTANT: Adhere to conditions of absolute cleanliness when performing repair work on the engine oil circuit.
When removing engine oil pipes and engine oil cooler, seal off all openings with suitable plugs.
To avoid engine damage, do not allow any dirt particles to get into the engine oil circuit.
Recycling
Engine oil escapes when the engine oil pipe is released.
Catch and dispose of emerging engine oil.
Observe country-specific waste disposal regulations.
Necessary preliminary work
- Lower FRONT AXLE SUPPORT.
- Remove WHEEL ARCH PANEL front section on right.
Release screw (1).
Tightening torque 17 22 4AZ.
Release screw (2).
Tightening torque 17 22 5AZ.
Remove engine oil pipes from oil filter control housing and oil sump.
Catch and dispose of emerging oil.
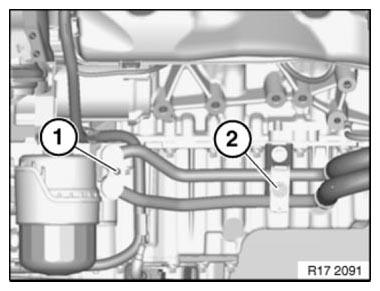
Fig. 49: Identifying Engine Oil Pipes Mounting Screws
Installation note: Replace all sealing rings of engine oil pipes! Release screw (1).
Tightening torque 17 22 6AZ
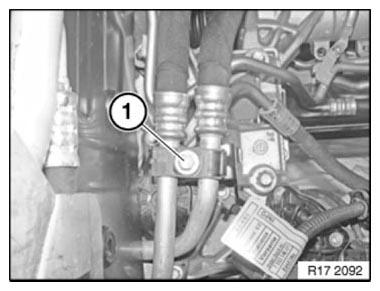
Fig. 50: Identifying Engine Oil Pipes Mounting Screw
Release screw (1).
Tightening torque 17 22 6AZ.
Unlock engine oil pipes (3) and detach from engine oil cooler (4).
Feed out engine oil pipes (3) and remove.
Catch and dispose of emerging oil.
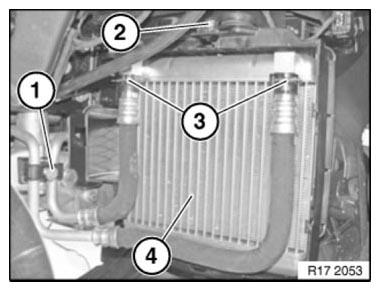
Fig. 51: Identifying Engine Oil Cooler With Engine Oil Pipes And Mounting
Screw
NOTE: After completion of repair work, check engine oil level. Refill if necessary.
Check engine oil pipes for tightness.
REMOVING AND INSTALLING/REPLACING INTERCOOLER EXPANSION TANK (N63)
IMPORTANT: Danger of scalding! Only perform this work after engine has cooled down.
Necessary preliminary tasks
- Remove ACOUSTIC COVER
- Drain coolant for intercooler
Release screws (1).
Tightening torque 17 10 7AZ.
Release coolant hoses (2) from expansion tank (3) and detach.
Installation: Replace faulty clamps.
Remove expansion tank (3).
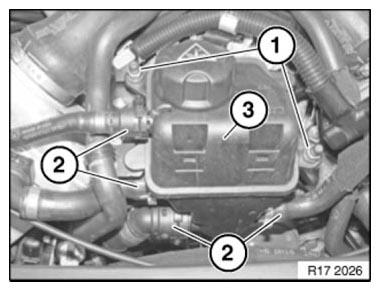
Fig. 52: Identifying Intercooler Expansion Tank With Coolant Hoses And
Mounting Screws
Assemble engine.
After completing work, fill intercooler with coolant.
Vent COOLING SYSTEM for intercooler.
Check cooling system for intercooler for leaks.
READ NEXT:
 Removing And Installing/Replacing Radiator For Charge Air Cooler
(N63, N74)
Removing And Installing/Replacing Radiator For Charge Air Cooler
(N63, N74)
WARNING: Risk of scalding! Only perform this repair work after engine
has cooled down.
IMPORTANT: When carrying out repair work on the coolant circuit,
protect the alternator from dirt contamination
Flushing Transmission Oil Cooler With Lines (Automatic
Transmission)
Notes
NOTE: Carry out the work steps listed when:
Installing a new or replacement transmission.
Flushing can only be carried out with the automatic transmission removed.
Procedure
Automatic transmiss
SEE MORE:
Replacing Outer Section Of Left Or Right Rear Wheel Housing (Side
Panel Removed)
Read contents of BODY, GENERAL.
Spot-weld bonding is used on this vehicle. Observe specific procedure.
Remove or cover those vehicle components in the repair area which are
susceptible to heat or dust.
Use only approved SPOT-WELDING APPARATUS for repairs.
Necessary preliminary tasks
Remove COVER
Sensors For DSC
Wheel speed sensors
The same type of wheel-speed sensor is used on the F01/F02 as on the E70/E71
(DF11i made by Robert Bosch
GmbH).
They are four active wheel-speed sensors, all four of which are connected by
dedicated two-core leads directly
to the DSC control unit. The wheel-speed data is trans
