BMW 7 Series: Removing And Installing/Replacing Radiator For Charge Air Cooler (N63, N74)
WARNING: Risk of scalding! Only perform this repair work after engine has cooled down.
IMPORTANT: When carrying out repair work on the coolant circuit, protect the alternator from dirt contamination.
Cover alternator with suitable materials.
Failure to comply with this procedure may result in an alternator malfunction.
Necessary preliminary work
- Remove COOLING LOOP for hydraulic steering (not ALPINA B7).
- Drain coolant for charge air cooler.
Release and disconnect coolant hoses (1).
Release lock (2).
Pull lines (3) with holder upwards.
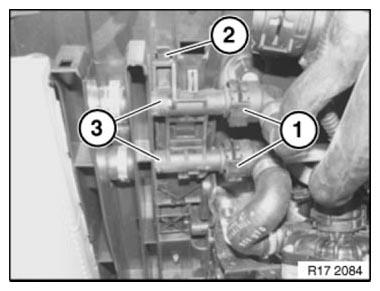
Fig. 53: Identifying Coolant Hoses With Pressure Lines And Locks
Lift out radiator for charge air cooler (1).
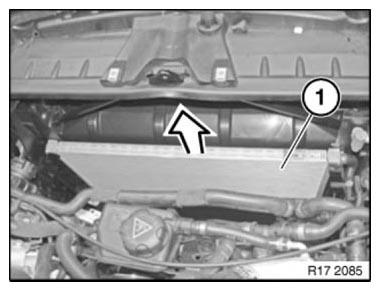
Fig. 54: Lifting Out Radiator For Charge Air Cooler
Assemble engine.
After completing the repair work, fill charge air cooler with coolant.
Vent COOLING SYSTEM FOR CHARGE AIR COOLER.
Check cooling system for tightness.
Assemble engine.
REMOVING AND INSTALLING/REPLACING THERMOSTAT CARTRIDGE (N63, N74)
IMPORTANT: Risk of scalding! Only perform this repair work after engine has cooled down.
Recycling
Catch and dispose of drained coolant in a suitable container.
Transmission oil emerges when the engine oil lines are detached from transmission oil cooler.
Catch and dispose of escaping transmission oil in a suitable container.
Observe country-specific waste disposal regulations.
Necessary preliminary work
- Drain COOLANT.
- Remove FAN COWL.
Release and disconnect coolant hoses (1).
Unscrew nuts (2).
Tightening torque 17 10 4AZ.
Remove thermostat insert (3).
Installation note:
- Clean contact surfaces.
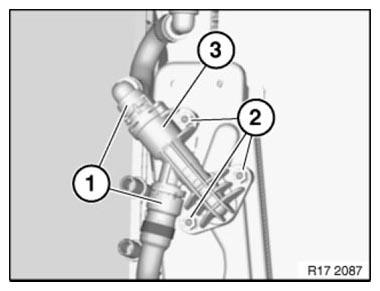
Fig. 55: Identifying Coolant Hoses With Mounting Nuts
Assemble engine.
Check the OIL LEVEL in the automatic transmission. If necessary, top up automatic transmission fluid.
REMOVING AND INSTALLING/REPLACING TRANSMISSION OIL COOLER (ALPINA B7 N63)
WARNING: Risk of scalding! Only perform this work after engine has cooled down.
IMPORTANT: Wear safety goggles and protective gloves.
Necessary preliminary work
- Remove front BUMPER TRIM
IMPORTANT: Adhere to conditions of absolute cleanliness when working on the transmission oil circuit.
When removing transmission oil lines and the transmission oil cooler, seal off all openings with suitable plugs.
To avoid transmission damage, do not allow any dirt particles to get into the transmission oil circuit.
Recycling
Transmission oil escapes when oil lines are released. Catch and dispose of escaping transmission oil.
Observe country-specific waste disposal regulations.
Release screw (1) on line clip.
Tightening torque 17 22 1AZ.
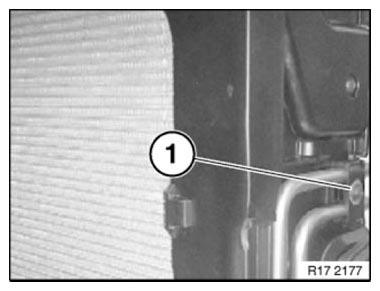
Fig. 56: Identifying Line Clip
Release bolt (1) on transmission oil cooler.
Tightening torque 17 22 2AZ.
Detach oil lines from transmission oil cooler.
Replace O-rings.
Seal oil lines with suitable sealing plugs.
Catch and dispose of escaping transmission oil.
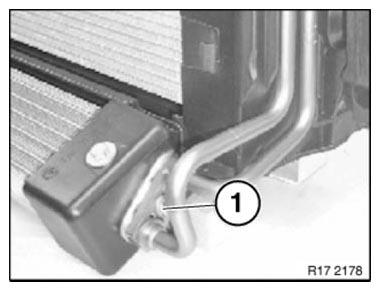
Fig. 57: Identifying Transmission Oil Cooler Mounting Bolts
Picture shows the right side, the procedure for the left side is identical.
Press together the retaining clips (1) on the left and right Remove transmission oil cooler towards front.
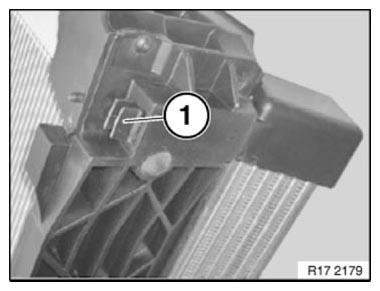
Fig. 58: Identifying Transmission Oil Cooler Mounting Clips
Only when replacing transmission oil cooler, modify holders on left and right.
Release screw (1).
Tightening torque 17 22 3AZ.
Remove holders on left and right.
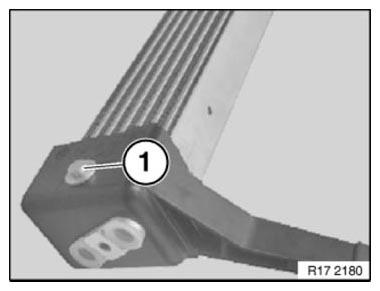
Fig. 59: Identifying Transmission Oil cooler Mounting Screw
NOTE: After completing work, check transmission oil level and top up transmission oil if necessary.
READ NEXT:
 Flushing Transmission Oil Cooler With Lines (Automatic
Transmission)
Flushing Transmission Oil Cooler With Lines (Automatic
Transmission)
Notes
NOTE: Carry out the work steps listed when:
Installing a new or replacement transmission.
Flushing can only be carried out with the automatic transmission removed.
Procedure
Automatic transmiss
Removing And Installing/Replacing Engine Oil Cooler (N54, N63)
Necessary preliminary tasks
Remove front right WHEEL ARCH TRIM.
WARNING: Danger of scalding!
Only perform this work after engine has cooled down.
IMPORTANT: Wear protective goggles and gloves.
IMPO
SEE MORE:
Auto Start/Stop function- Starting the engine
Functional requirements
Steptronic transmission
The engine starts automatically under the following
preconditions:
By releasing the brake pedal.
When Automatic Hold is activated: press the
accelerator pedal.
Driving off
After the engine starts, accelerate as usual.
Safety mode
After the engine
Replacing Operating Unit For Seat Adjustment
IMPORTANT: Read and comply with notes on protection against electrostatic
damage (ESD
PROTECTION).
Necessary preliminary work
Remove COVER FROM FRONT SEAT
Release screws (1).
Raise operating unit for seat adjustment (2).
Fig. 257: Identifying Operating Unit With Screws
Disconnect plug connecti
