BMW 7 Series: Removing And Installing/Replacing Engine Oil Cooler (N54, N63)
Necessary preliminary tasks
- Remove front right WHEEL ARCH TRIM.
WARNING: Danger of scalding! Only perform this work after engine has cooled down.
IMPORTANT: Wear protective goggles and gloves.
IMPORTANT: Adhere to conditions of absolute cleanliness when working on the engine oil circuit.
When removing engine oil lines and engine oil cooler, seal off all openings with suitable plugs.
To avoid engine damage, do not allow any dirt particles to get into the engine oil circuit.
Recycling Engine oil escapes when oil lines are released. Catch and dispose of emerging engine oil.
Observe country-specific waste-disposal regulations.
Release screw (1).
On N54 release retainer.
Tightening torque 17 22 6AZ.
Release screw (2).
Tightening torque 17 22 8AZ.
Unlock oil lines (3) and detach from engine oil cooler flange.
Seal off engine oil cooler flange and engine oil lines.
Catch and dispose of emerging oil.
Remove engine oil cooler (4).
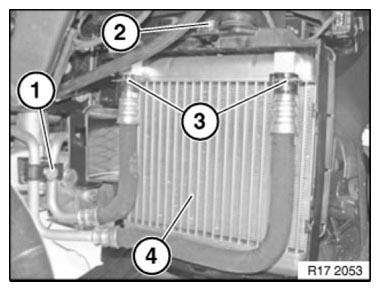
Fig. 66: Identifying Engine Oil Cooler With Oil Lines And Mounting Screw
NOTE: After completing work, check engine oil level and top up engine oil if necessary.
Removing And Installing/Replacing Feed And Return Lines For Engine Oil Cooler (N63)
WARNING: Risk of scalding! Only perform this repair work after engine has cooled down.
IMPORTANT: Wear protective gloves and safety goggles.
IMPORTANT: Adhere to conditions of absolute cleanliness when performing repair work on the engine oil circuit.
When removing engine oil pipes and engine oil cooler, seal off all openings with suitable plugs.
To avoid engine damage, do not allow any dirt particles to get into the engine oil circuit.
Recycling
Engine oil escapes when the engine oil pipe is released.
Catch and dispose of emerging engine oil.
Observe country-specific waste disposal regulations.
Necessary preliminary work
- Lower FRONT AXLE SUPPORT.
- Remove WHEEL ARCH PANEL front section on right.
Release screw (1).
Tightening torque 17 22 4AZ.
Release screw (2).
Tightening torque 17 22 5AZ.
Remove engine oil pipes from oil filter control housing and oil sump.
Catch and dispose of emerging oil.
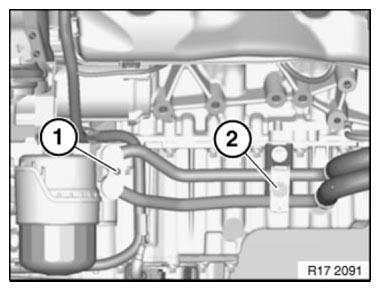
Fig. 67: Identifying Engine Oil Pipes Mounting Screws
Installation note: Replace all sealing rings of engine oil pipes! Release screw (1).
Tightening torque 17 22 6AZ.
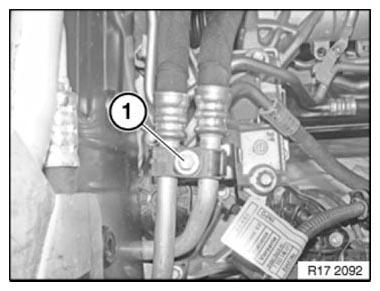
Fig. 68: Identifying Engine Oil Pipes Mounting Screws
Release screw (1).
Tightening torque 17 22 6AZ.
Unlock engine oil pipes (3) and detach from engine oil cooler (4).
Feed out engine oil pipes (3) and remove.
Catch and dispose of emerging oil.

Fig. 69: Identifying Engine Oil Cooler With Engine Oil Pipes And Mounting
Screw
NOTE: After completion of repair work, check engine oil level. Refill if necessary.
Check engine oil pipes for tightness.
REMOVING AND INSTALLING/REPLACING TRANSMISSION OIL COOLER (ALPINA B7 N63)
WARNING: Risk of scalding! Only perform this work after engine has cooled down.
IMPORTANT: Wear safety goggles and protective gloves.
Necessary preliminary work
- Remove front BUMPER TRIM
IMPORTANT: Adhere to conditions of absolute cleanliness when working on the transmission oil circuit.
When removing transmission oil lines and the transmission oil cooler, seal off all openings with suitable plugs.
To avoid transmission damage, do not allow any dirt particles to get into the transmission oil circuit.
Recycling
Transmission oil escapes when oil lines are released. Catch and dispose of escaping transmission oil.
Observe country-specific waste disposal regulations.
Release screw (1) on line clip.
Tightening torque 17 22 1AZ.
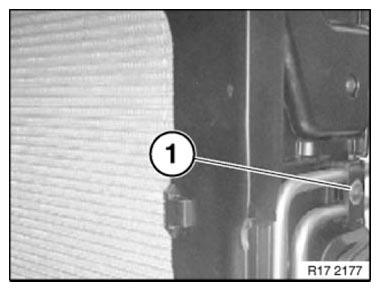
Fig. 70: Identifying Oil Pipe Mounting Screws
Release bolt (1) on transmission oil cooler.
Tightening torque 17 22 2AZ.
Detach oil lines from transmission oil cooler.
Replace O-rings.
Seal oil lines with suitable sealing plugs.
Catch and dispose of escaping transmission oil.
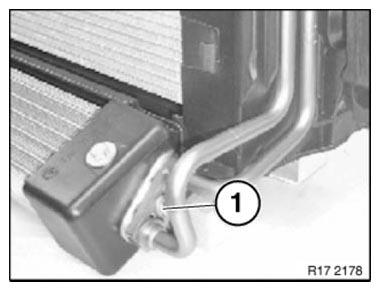
Fig. 71: Identifying Transmission Oil Cooler Mounting Bolts
Picture shows the right side, the procedure for the left side is identical.
Press together the retaining clips (1) on the left and right.
Remove transmission oil cooler towards front.
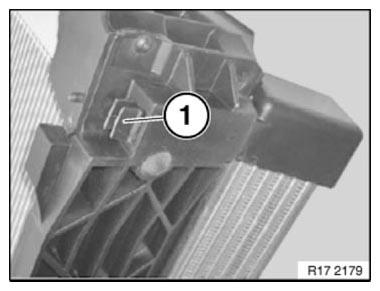
Fig. 72: Identifying Transmission Oil Cooler Mounting Clips
Only when replacing transmission oil cooler, modify holders on left and right.
Release screw (1).
Tightening torque 17 22 3AZ.
Remove holders on left and right.
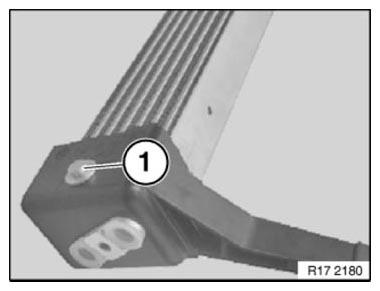
Fig. 73: Identifying Transmission Oil Cooler Mounting Screws
NOTE: After completing work, check transmission oil level and top up transmission oil if necessary.
READ NEXT:
 Flushing Transmission Oil Cooler With Lines (Automatic
Transmission)
Flushing Transmission Oil Cooler With Lines (Automatic
Transmission)
Notes
NOTE: Carry out the work steps listed when:
Installing a new or replacement transmission.
Flushing can only be carried out with the automatic transmission removed.
Procedure
Automatic transmiss
Removing And Installing/Replacing Feed And Return Lines For Engine Oil
Cooler (N63)
WARNING: Risk of scalding!
Only perform this repair work after engine has cooled down.
IMPORTANT: Wear protective gloves and safety goggles.
IMPORTANT: Adhere to conditions of absolute cleanliness whe
SEE MORE:
Overview Of Heater - A/C System Components
Fig. 167: Overview Of Heater And A/C System Components
Condenser for air conditioner
Drier insert for air conditioner
Independent heater and attachment parts
Water valve
Heater - A/C system and attachment parts
Fan and attachment parts
Compressor
SAFETY INSTRUCTIONS FOR HANDLING REFRIGERAN
Removing And Installing/Renewing Pressure Lines For Valve Block
(Short)
Notes
WARNING: DANGER OF POISONING if oil is ingested/absorbed through the
skin!
RISK OF INJURY if oil comes into contact with eyes and skin!
IMPORTANT: Adhere to the utmost cleanliness. Do not allow any dirt to
enter the hydraulic system.
Do not draw off hydraulic fluid (risk of contamination).
