BMW 7 Series: Removing And Installing/Renewing Central Bass Speaker-Driver's Side- (Under Front Seat)
Necessary preliminary tasks
- Remove FRONT SEAT, DRIVER'S SIDE
- Remove PANEL FOR DOOR PILLAR.
Pull trim (1) in direction of arrow towards rear and lift out.
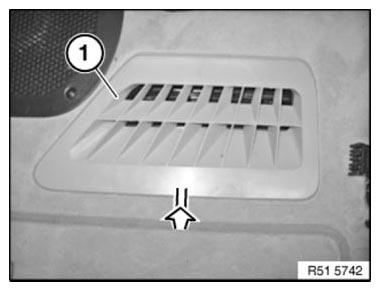
Fig. 12: Identifying Trim
Release plastic nut (1).
Feed out air duct (2).
Release screws (4).
Remove central bass speaker cover (3).
Fold back floor trims.
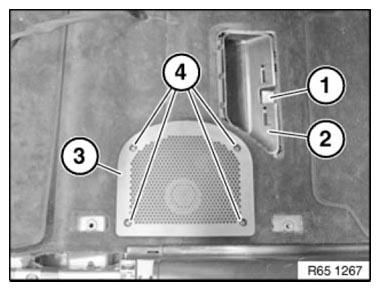
Fig. 13: Identifying Screws And Speaker Cover
Unscrew nuts (1).
Unfasten plug connection (2) and disconnect.
Feed out central bass carrier (3) in direction of arrow.
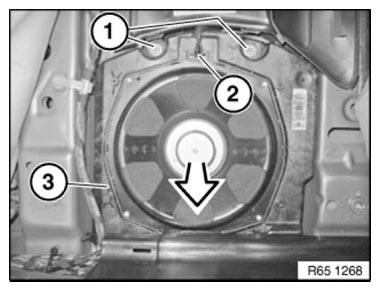
Fig. 14: Identifying Nuts, Plug Connection And Central Bass Carrier
REMOVING AND INSTALLING/RENEWING CENTRAL BASS SPEAKER - PASSENGER SIDE- (UNDER FRONT SEAT)
Necessary preliminary tasks
- Remove FRONT PASSENGER SEAT.
- Remove PANEL FOR DOOR PILLAR.
The following operations are described for the left side. The procedure for the right side is identical.
Pull trim (1) in direction of arrow towards rear and lift out.

Fig. 15: Identifying Trim
Release plastic nut (1).
Feed out air duct (2).
Release screws (4).
Remove central bass speaker cover (3).
Fold back floor trims.

Fig. 16: Identifying Screws Plastic Nut, Air Duct And Central Bass Speaker
Cover
Unscrew nuts (1).
Unfasten plug connection (2) and disconnect.
Feed out central bass carrier (3) in direction of arrow.

Fig. 17: Identifying Nuts, Plug Connection And Central Bass Carrier
REMOVING AND INSTALLING/REPLACING DVD PLAYER IN REAR CONSOLE
IMPORTANT: Read and comply with NOTES on protection against electrostatic damage (ESD protection).
NOTE: Comply with notes and instructions on NOTES ON HANDLING OPTICAL FIBRES.
Necessary preliminary work
- F01/02: Clamp off BATTERY EARTH LEAD
- F03: Remove both battery earth leads
- Remove REAR CENTRE CONSOLE TRIM
- Remove CENTRE ARMREST STORAGE COMPARTMENT
Unlock plug connections (1) and (2) and disconnect.
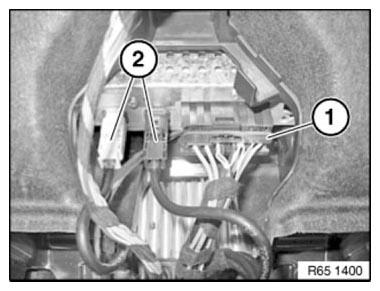
Fig. 18: Identifying Plug Connections
Release screws (1).
Remove DVD player (2).
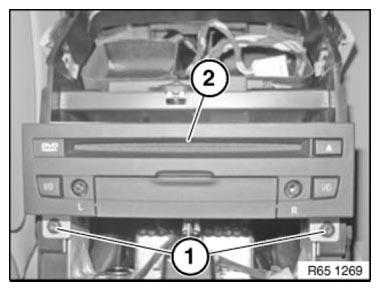
Fig. 19: Identifying Screws And DVD Player
Replacement
Carry out VEHICLE PROGRAMMING/ENCODING.
READ NEXT:
 Removing And Installing/Replacing Amplifier
IMPORTANT: Read and comply with NOTES on protection against electrostatic
damage (ESD
protection).
NOTE: Comply with notes and instructions on NOTES ON HANDLING OPTICAL
FIBRES.
Necessary preliminary
Overview Of Audio Components
Fig. 25: Overview Of Audio Components
Speaker (in dashboard)
Central Information Display (CID)
DVD changer
DVD player, rear console
Aerial diversity
Speaker (in storage shelf)
Satellite tuner
SEE MORE:
Replacing Rear Cross Member On Luggage Compartment Floor (Tail
Panel Removed)
Read contents of BODY, GENERAL.
STRIP DOWN VEHICLE
Observe new procedure for bonding and riveting (REPAIR STAGE 2).
Following new body parts are required:
End of luggage compartment floor Following CONSUMABLES are required:
MATERIAL CHART
Fig. 181: Identifying End Of Luggage Compartment Floor
With Parking Assistant: Parking Assistant- Driving out of a parking space
using the parking assistant
Concept
The system makes driving out of parallel parking
spaces easier.
General information
Steptronic transmission
The parking assistant calculates an optimal line
for pulling out of a parking space and takes control
of the following functions during the maneuver:
Steering.
Accelerating and brak
