BMW 7 Series: Removing And Installing/Replacing Amplifier
IMPORTANT: Read and comply with NOTES on protection against electrostatic damage (ESD protection).
NOTE: Comply with notes and instructions on NOTES ON HANDLING OPTICAL FIBRES.
Necessary preliminary work
- Clamp off NEGATIVE BATTERY CABLE.
- Remove LUGGAGE COMPARTMENT WHEEL ARCH PANEL ON LEFT.
Release screw (1).
Remove amplifier (4) including holder (2).
Unfasten plug connections (3) and disconnect.
Replacement
Remove amplifier (4) including holder (3).

Fig. 20: Identifying Screw, Amplifier And Plug Connection
Installation note: Tabs (1) must be correctly slid into guide (2).
Check that amplifier (3) is securely seated.
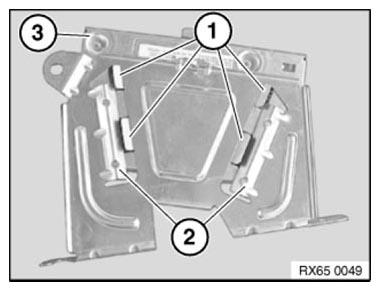
Fig. 21: Identifying Tabs, Guide And Amplifier
Replacement
For vehicle with production date up to 09/2010 , carry out conversion in the diagnosis system via path:
- Vehicle
- Conversions
- Conversion hi-fi system
NOTE: On vehicle with production date after 09/2010 , no vehicle programming/encoding needs to be carried out!
REMOVING AND INSTALLING/REPLACING SATELLITE RADIO (US VERSION ONLY UNTIL 09/2009)
IMPORTANT: Read and comply with notes on PROTECTION AGAINST ELECTROSTATIC DISCHARGE (ESD PROTECTION).
NOTE: See NOTES ON HANDLING OPTICAL FIBRES.
Necessary preliminary work
- Disconnect BATTERY NEGATIVE LEAD.
- Remove LUGGAGE COMPARTMENT WHEEL ARCH TRIM ON LEFT.
Unlock plug connections (1) and disconnect.
Unfasten screws (2).
Unscrew nut (3).
Remove satellite radio (4) with holder.
Replacement
Release screws (5).
Remove satellite radio (4) from holder.
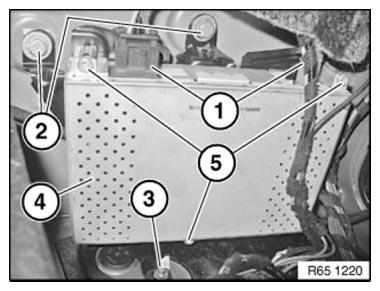
Fig. 22: Identifying Plug Connections, Screws, Nut And Satellite Radio
When replacing, please observe
Record ID number (2) of the removed device.
NOTE: The ID number (2) can be found on the label of the housing. Above the barcode the text reads "Sirius ID" (1) and next to it is the company's logo "Sirius Satellite Radio" (3).
Record ID number (2) of the new device.
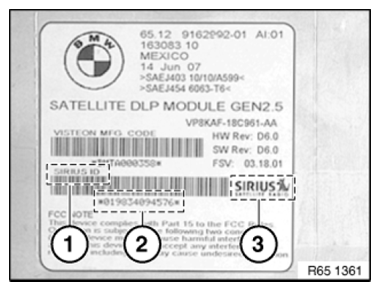
Fig. 23: Identifying Sirius ID, ID Number And Sirius Satellite Radio
Replacement
Carry out VEHICLE PROGRAMMING AND ENCODING.
NOTE: Please contact Sirius. Use the ID number to cancel current device and register new one.
REMOVING AND INSTALLING/REPLACING SATELLITE TUNER (ONLY FOR US MODELS STARTING AT 09/2009)
Necessary preliminary work
- Remove CAR INFOTAINMENT COMPUTER
When replacing, please observe
Record SID number (1) of the removed device.
NOTE: The SID number (1) can be found on the label of the housing. Location may be different, depending on the manufacturer of the device.
Record SID number (1) of the new device.
Input enabling code from the ASAP portal.
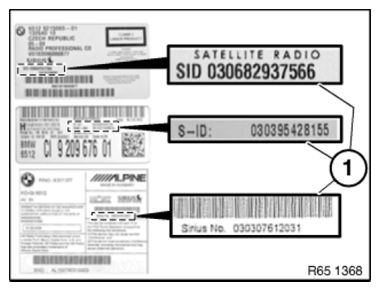
Fig. 24: Identifying SID Number
Replacement
Carry out VEHICLE PROGRAMMING/ENCODING.
NOTE: Please contact Sirius. Use the SID number to cancel current device and register new one.
READ NEXT:
 Overview Of Audio Components
Fig. 25: Overview Of Audio Components
Speaker (in dashboard)
Central Information Display (CID)
DVD changer
DVD player, rear console
Aerial diversity
Speaker (in storage shelf)
Satellite tuner
Removing And Installing/Replacing Front Speaker Carrier (Instrument Panel)
Notes
Unclip trim (1) from latching mechanisms with special tool 00 9 325.
Fig. 31: Removing Trim From Latch Mechanisms Using Special Tool (00 9 325)
Release screws (1).
Remove speaker carrier (2) a
SEE MORE:
Removing And Installing Or Replacing Both Rear Brake Discs
Necessary preliminary work
Remove WHEELS.
Remove and clean BRAKE PADS.
After completing repair work:
Adjust PARKING BRAKE (not F10F11F18F25)
Read and comply with notes on BRAKING IN NEW BRAKE DISCS/BRAKE PADS.
Check minimum brake disc thickness:
Position special tool 34 1 280 at three meas
Removing Hydraulic Chain Tensioner For Timing Chains On Left Side
(N63)
Notes
WARNING: Chain tensioner is pre-tensioned.
Release lock pin only in installed state.
Danger of injury!
IMPORTANT: Risk of damage!
The engine must not be cranked when the chain tensioner is removed.
The timing chain may jump.
Necessary preliminary work
Remove TIMING CASE COVER at top left
