BMW 7 Series: Overview Of Audio Components
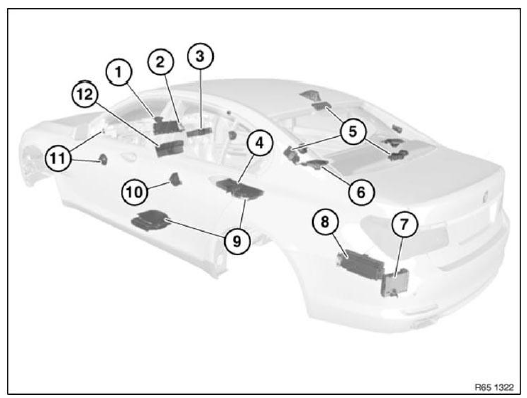
Fig. 25: Overview Of Audio Components
- Speaker (in dashboard)
- Central Information Display (CID)
- DVD changer
- DVD player, rear console
- Aerial diversity
- Speaker (in storage shelf)
- Satellite tuner
- Amplifier
- Central bass speaker
- Speaker (door, rear)
- Speaker (door, front)
- Car Information Computer (CIC)
REMOVING AND INSTALLING/RENEWING SPEAKER (MIDRANGE SPEAKER, IN INSTRUMENT PANEL)
Notes
Unclip trim (1) with special tool 00 9 325 from latch mechanisms and remove upwards.
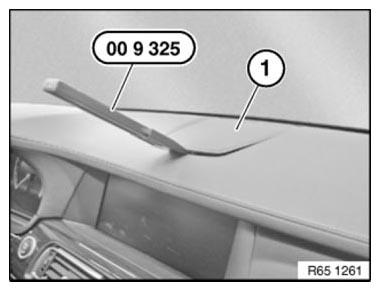
Fig. 26: Removing Trim From Latch Mechanisms Using Special Tool (00 9 325)
Installation
Marked retaining lugs must not be damaged.
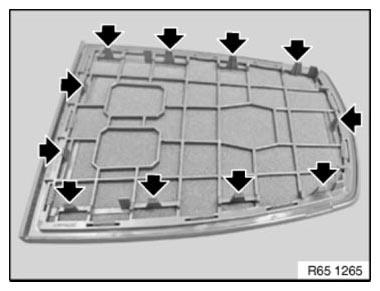
Fig. 27: Locating Retaining Lugs
NOTE: Graphic is an example!
Release screws (1).
Remove speaker (2).
Disconnect plug connection underneath and remove speaker (2).
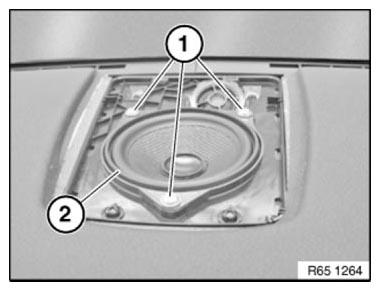
Fig. 28: Identifying Screws And Speaker
REMOVING AND INSTALLING/REPLACING DVD PLAYER IN REAR CONSOLE
IMPORTANT: Read and comply with NOTES on protection against electrostatic damage (ESD protection).
NOTE: Comply with notes and instructions on NOTES ON HANDLING OPTICAL FIBRES.
Necessary preliminary work
- F01/02: Clamp off BATTERY EARTH LEAD
- F03: Remove both battery earth leads
- Remove REAR CENTRE CONSOLE TRIM
- Remove CENTRE ARMREST STORAGE COMPARTMENT
Unlock plug connections (1) and (2) and disconnect.
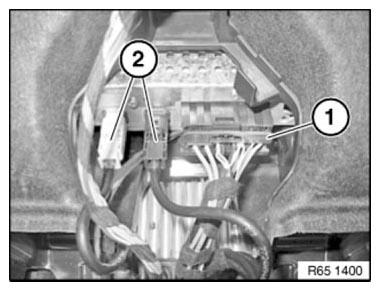
Fig. 29: Identifying Plug Connections
Release screws (1).
Remove DVD player (2).
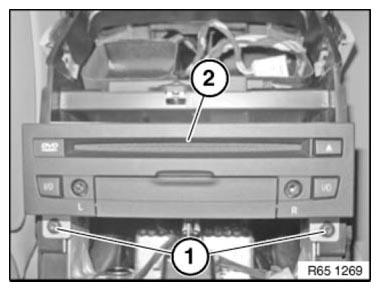
Fig. 30: Identifying Screws And DVD Player
Replacement
Carry out VEHICLE PROGRAMMING/ENCODING.
READ NEXT:
 Removing And Installing/Replacing Front Speaker Carrier (Instrument Panel)
Notes
Unclip trim (1) from latching mechanisms with special tool 00 9 325.
Fig. 31: Removing Trim From Latch Mechanisms Using Special Tool (00 9 325)
Release screws (1).
Remove speaker carrier (2) a
Overview Of Aerial Diversity
Fig. 50: Overview Of Aerial Diversity
Aerial amplifier
Blocking circuit
AM choke
Back - up aerial
Interference suppression filter
OVERVIEW OF AUDIO COMPONENTS
Fig. 51: Overview Of Audio Compo
SEE MORE:
Removing And Installing/Replacing Feed And Return Lines For Engine Oil
Cooler (N63)
WARNING: Risk of scalding!
Only perform this repair work after engine has cooled down.
IMPORTANT: Wear protective gloves and safety goggles.
IMPORTANT: Adhere to conditions of absolute cleanliness when performing
repair work on
the engine oil circuit.
When removing engine oil pipes and engine oil
Torque Converter Bearing, Seal
REPLACING TORQUE CONVERTER SHAFT SEAL (GA6HP26Z)
Necessary preliminary tasks
Remove AUTOMATIC TRANSMISSION
IMPORTANT: After completion of work, check TRANSMISSION OIL LEVEL.
Use only approved TRANSMISSION OIL.
Failure to comply with this instruction will result in serious damage to the
transmis
