BMW 7 Series: Removing And Installing Radiator (N63, N74)
WARNING: Risk of scalding! Only perform this repair work after engine has cooled down.
IMPORTANT: Wear safety goggles and protective gloves.
Necessary preliminary tasks
- Remove FAN COWL.
Drain COOLANT
- Draw off A/C SYSTEM.
- Unlock and detach coolant hoses on radiator.
Release screws (1).
Tightening torque 17 10 6AZ.
Detach A/C lines (2) and place to one side.
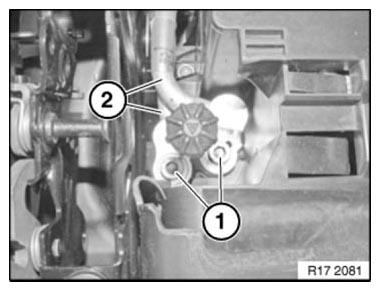
Fig. 33: Identifying A/C Line With Mounting Screws
Installation note:
Replace sealing rings.
Release screws (1) on left and right from cover (3).
Tightening torque 17 10 1AZ.
Release screws (2) behind sealing lip.
Tightening torque 17 10 1AZ.
Lift out cover (3).
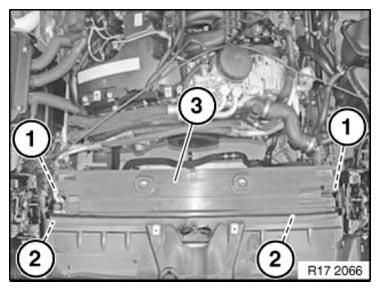
Fig. 34: Identifying Radiator Cover With Mounting Screws
Remove radiator (1) towards top.
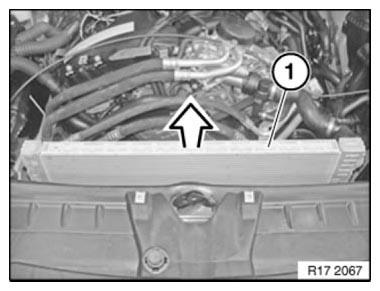
Fig. 35: Removing Radiator Towards Top
Reassemble the vehicle.
Fill A/C SYSTEM.
Check COOLING SYSTEM for leaks.
REMOVING AND INSTALLING/RENEWING COOLANT EXPANSION TANK (N63)
Necessary preliminary work
- Drain COOLANT.
- Remove left TRAILING LINK.
- Remove left intake duct.
- Release EXPANSION TANK for hydraulic steering or dynamic drive and place to one side.
Release screw (1).
Tightening torque 17 10 2AZ.
Release and disconnect coolant hoses (2).
Raise expansion tank (3)
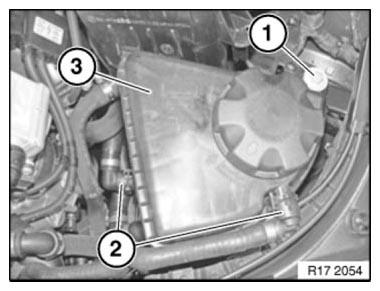
Fig. 36: Identifying Coolant Expansion Tank With Hoses And Mounting Screws
Unlock connector (1) on coolant level switch and disconnect.
Remove expansion tank (2).
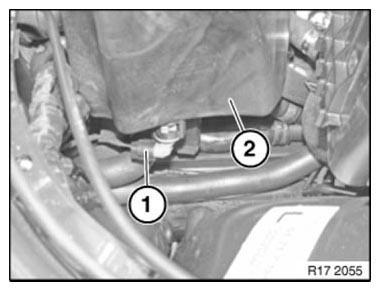
Fig. 37: Identifying Coolant Expansion Tank With Coolant Level Switch
Connector
Assemble engine.
Top up COOLANT.
Check cooling system for LEAK TIGHTNESS.
READ NEXT:
 Removing And Installing/Replacing Cooling Coil For Power Steering
(N63, N74)
Removing And Installing/Replacing Cooling Coil For Power Steering
(N63, N74)
WARNING: Danger of scalding!
Only perform this work after engine has cooled down.
IMPORTANT: When working on the oil and cooling circuit, protect the
alternator against
dirt/contaminants.
Cover alter
Removing And Installing/Replacing Engine Oil Cooler (N54, N63)
Necessary preliminary tasks
Remove front right WHEEL ARCH TRIM.
WARNING: Danger of scalding!
Only perform this work after engine has cooled down.
IMPORTANT: Wear protective goggles and gloves.
IMPO
Removing And Installing/Replacing Feed And Return Lines For Engine
Oil Cooler (N63)
WARNING: Risk of scalding! Only perform this repair work after
engine has cooled down.
IMPORTANT: Wear protective gloves and safety goggles.
IMPORTANT: Adhere to conditions of absolute cleanliness wh
SEE MORE:
Washer fluid
General information
All washer nozzles are supplied from one reservoir.
Use a mixture of tap water and windshield
washer concentrate. If desired, a windshield washer concentrate containing
antifreeze can be
used.
Recommended minimum fill quantity:
0.2 US gal/1 liter.
Safety information
Warning
So
Removing And Installing/Replacing Pressure Line For Valve Block
VA1
Notes
WARNING: DANGER OF POISONING if oil is ingested/absorbed through
the skin! RISK OF INJURY if oil comes into contact with eyes and skin!
IMPORTANT: Adhere to the utmost cleanliness. Do not allow any dirt to
enter the hydraulic
system.
Do not draw off hydraulic fluid (risk of contamination).
