BMW 7 Series: Removing And Installing/Replacing Engine Oil Cooler (N54, N63)
Necessary preliminary tasks
- Remove front right WHEEL ARCH TRIM.
WARNING: Danger of scalding! Only perform this work after engine has cooled down.
IMPORTANT: Wear protective goggles and gloves.
IMPORTANT: Adhere to conditions of absolute cleanliness when working on the engine oil circuit.
When removing engine oil lines and engine oil cooler, seal off all openings with suitable plugs.
To avoid engine damage, do not allow any dirt particles to get into the engine oil circuit.
Recycling
Engine oil escapes when oil lines are released. Catch and dispose of emerging engine oil.
Observe country-specific waste-disposal regulations.
Release screw (1).
On N54 release retainer.
Tightening torque 17 22 6AZ.
Release screw (2).
Tightening torque 17 22 8AZ.
Unlock oil lines (3) and detach from engine oil cooler flange.
Seal off engine oil cooler flange and engine oil lines.
Catch and dispose of emerging oil.
Remove engine oil cooler (4).
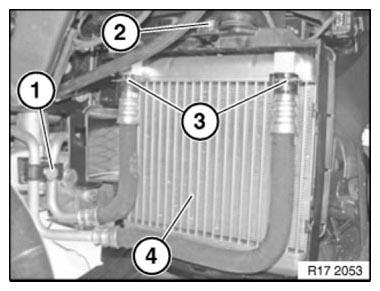
Fig. 43: Identifying Engine Oil Cooler With Oil Lines And Mounting Bolts
NOTE: After completing work, check engine oil level and top up engine oil if necessary.
REMOVING AND INSTALLING/REPLACING FAN COWL WITH ELECTRIC FAN (N63)
Necessary preliminary tasks
- Read out fault memory of DME control unit
- Turn off ignition
- Remove CROSS-MEMBER
- Remove intake duct on left and right
- Remove front UNDERBODY PROTECTION
Detach coolant hose from fan cowl at retainer (1).
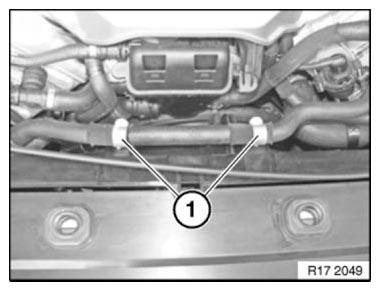
Fig. 44: Identifying Coolant Hose Retainer
Unlock and disconnect plug (1) on fan cowl.
Release screw (2) on holder for coolant hoses.
Tightening torque 17 10 5AZ.
Detach coolant hoses with holder from fan cowl.
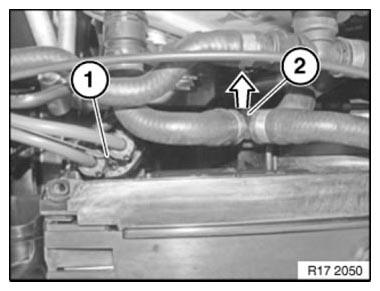
Fig. 45: Detaching Coolant Hoses From Fan Cowl
Release screw (1).
Tightening torque 17 10 3AZ.
Detach transmission oil cooler upwards from fan cowl.
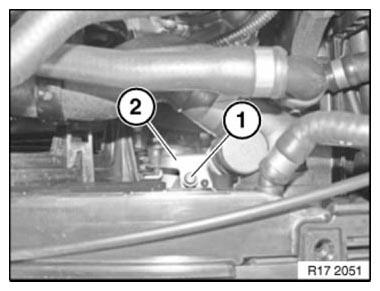
Fig. 46: Identifying Transmission Oil Cooler Retainer With Mounting Screws
Unclip fan cowl (1) at retainers (2) on left and right, feed out in upward direction and remove.
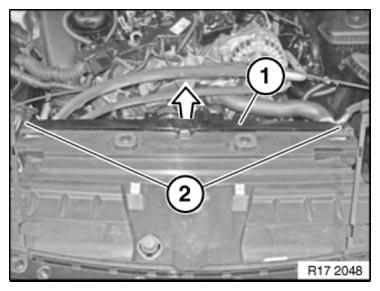
Fig. 47: Removing Fan Cowl In Upward Direction
Installation:
Insert retaining tab (1) at bottom on module carrier.
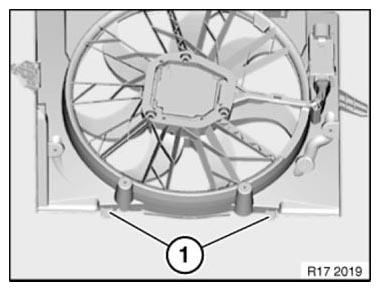
Fig. 48: Identifying Fan Cowl Plug
NOTE: Check stored fault message.
Reassemble the vehicle.
Clear fault memory.
READ NEXT:
 Removing And Installing/Replacing Feed And Return Lines For Engine
Oil Cooler (N63)
Removing And Installing/Replacing Feed And Return Lines For Engine
Oil Cooler (N63)
WARNING: Risk of scalding! Only perform this repair work after
engine has cooled down.
IMPORTANT: Wear protective gloves and safety goggles.
IMPORTANT: Adhere to conditions of absolute cleanliness wh
Removing And Installing/Replacing Radiator For Charge Air Cooler
(N63, N74)
WARNING: Risk of scalding! Only perform this repair work after engine
has cooled down.
IMPORTANT: When carrying out repair work on the coolant circuit,
protect the alternator from dirt contamination
SEE MORE:
System Overview
The following pages show the input/outputs and the schematic circuit diagrams
of the F01/F02 voice input and
activation systems.
The driver's side microphone is the only device used for voice input.
Voice input is always activated by pressing the PTT button (push-to-talk button)
on the steering
Service Information
Instrument Cluster Test Functions
The test functions are shown in the TFT display of the instrument cluster.
To Start Function Test
Terminal R ON or terminal 15 ON.
Press and hold the reset button in the instrument cluster for 10 seconds
(set/reset).
or
by holding down the setting button in
