BMW 7 Series: Removing And Installing/Replacing Cooling Coil For Power Steering (N63, N74)
WARNING: Danger of scalding! Only perform this work after engine has cooled down.
IMPORTANT: When working on the oil and cooling circuit, protect the alternator against dirt/contaminants.
Cover alternator with suitable materials.
Failure to comply with this procedure may result in an alternator malfunction.
Necessary preliminary tasks
- Remove A/C CONDENSER
- After completing this operation, check fluid level in hydraulic steering fluid reservoir.
Remove circlips (1).
Unlock lines (2) and detach from cooling coil.
Press in catches (3) and pull cooling coil together with module carrier upwards.
IMPORTANT: Catch and dispose of emerging oil.
Installation:
Reinstall circlips.
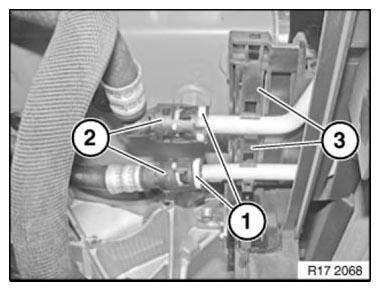
Fig. 38: Identifying Pressure Lines With Catches And Circlips
Release module carrier (2) in direction of arrow.
Lift out cooling coil (1) together with module carrier (2).
Installation: When replacing cooling coil, modify module carrier on left and right.
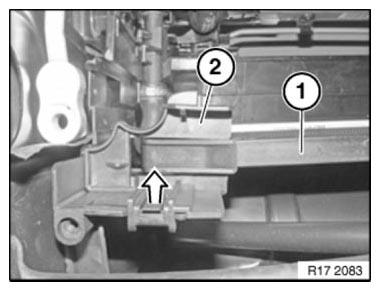
Fig. 39: Releasing Module Carrier Upwards
Reassemble the vehicle.
Check hydraulic steering for leaks.
REMOVING AND INSTALLING/REPLACING COOLING LOOP FOR HYDRAULIC STEERING (ALPINA B7 N63)
WARNING: Risk of scalding! Only perform this repair work after engine has cooled down.
IMPORTANT: When carrying out repair work on the oil and cooling circuit, protect the alternator against dirt contamination.
Cover alternator with suitable materials.
Failure to comply with this procedure may result in an alternator malfunction.
Necessary preliminary work
- Remove RADIATOR.
- Remove RADIATOR for charge air cooler.
- Remove AIR CONDITIONING CONDENSER
The cooling loop for the hydraulic steering is fitted at the front in the radiator package.
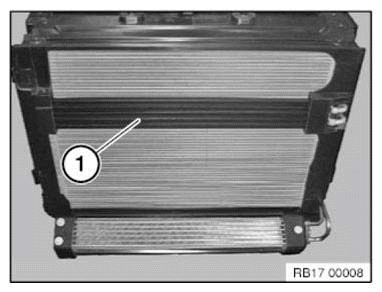
Fig. 40: Identifying Cooling Loops For Hydraulic Steering In Radiator Package
Remove circlips.
Unlock lines (1) and detach from cooling loop.
Installation note: Fit the angled line at the top.
All lines must engage audibly and be secured with the circlip against slipping!
IMPORTANT: Catch and dispose of emerging oil.
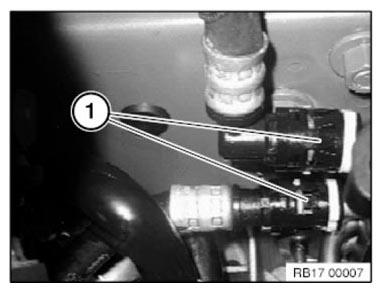
Fig. 41: Identifying Cooling Lines
Release screw (1).
Tightening torque 17 10 9AZ.
Feed out and remove the cooling loop.

Fig. 42: Identifying Cooling Loop Mounting Screw
Reassemble the vehicle.
AFTER COMPLETING THIS REPAIR WORK, CHECK OIL LEVEL IN OIL RESERVOIR OF HYDRAULIC STEERING.
If Dynamic Drive is fitted, execute COMMISSIONING FOR DYNAMIC DRIVE.
Check hydraulic steering for leak tightness.
READ NEXT:
 Removing And Installing/Replacing Engine Oil Cooler (N54, N63)
Necessary preliminary tasks
Remove front right WHEEL ARCH TRIM.
WARNING: Danger of scalding!
Only perform this work after engine has cooled down.
IMPORTANT: Wear protective goggles and gloves.
IMPO
Removing And Installing/Replacing Feed And Return Lines For Engine
Oil Cooler (N63)
WARNING: Risk of scalding! Only perform this repair work after
engine has cooled down.
IMPORTANT: Wear protective gloves and safety goggles.
IMPORTANT: Adhere to conditions of absolute cleanliness wh
Removing And Installing/Replacing Radiator For Charge Air Cooler
(N63, N74)
WARNING: Risk of scalding! Only perform this repair work after engine
has cooled down.
IMPORTANT: When carrying out repair work on the coolant circuit,
protect the alternator from dirt contamination
SEE MORE:
Crimping Micro Power Quadlock Contacts (MPQ)
Notes
To crimp MPQ contacts, use hand pliers 61 4 321 (1) in conjunction with
crimping head 61 4 325 (2) from
crimping set 61 4 320.
NOTE: Hand pliers (1) open automatically as far as they will go when
handles are
pressed together.
Fig. 136: Identifying Hand Pliers With Crimping Head (61 4 325)
O
Comfort Access- Touchless unlocking and locking
of the vehicle
Concept
The vehicle will be unlocked when the driver approaches
the locked vehicle with the vehicle key.
When the driver walks away from the unlocked
vehicle with the vehicle key, the vehicle will be
locked.
General information
The vehicle will be unlocked when an authorized
vehicle key is detected
