BMW 7 Series: Displays, control elements
In the vicinity of the steering wheel
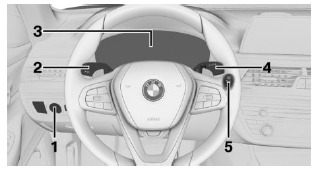
- Light switch element
- Turn signal indicator, high beams
- Instrument cluster
- Wipers
- Start/Stop button
Indicator/warning lights
Instrument cluster
The indicator/warning lights can light up in a variety of combinations and colors.
Several of the lights are checked for proper functioning and light up temporarily when the engine is started or standby state is switched on.
Driver's door
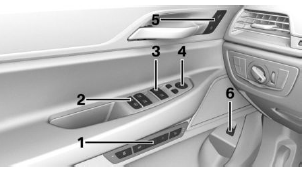
- Seats, comfort features
- Safety switch
- Power windows
- Exterior mirrors
- Central locking system
- Opening/closing trunk lid
Switch console
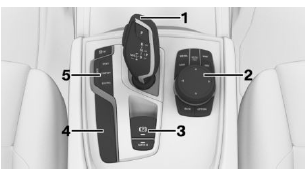
- Selector lever
- Controller
- Parking brake, Automatic Hold
- Parking assistance systems
- Driving Dynamics Control
iDrive
Concept
The iDrive combines the functions of many switches. These functions can be operated via the Controller.
Buttons on the Controller
Button /Function
 Opens the main menu.
 Opens the Media/Radio menu.
 Opens the Communication menu.
 Opens navigation map.
 Opens destination input menu for
navigation.
 Opens the previous display.
 Opens the Options menu.
Voice activation
Activating the voice activation system
 Press the button on the
steering wheel.- Wait for the signal.
- Say the command.
 This symbol indicates that the
voice activation
system is active.
No other commands may be available. In this case, operate the function via iDrive.
Terminating the voice activation system
 Press the button on the steering
wheel
or ›Cancel‹.
 This symbol indicates that the
voice activation
system is deactivated.
READ NEXT:
 Seats, mirrors, and steering
wheel
Seats, mirrors, and steering
wheel
Electrically adjustable seats
Thigh support
Forward/backward, height, seat tilt
Upper backrest
Backrest width
Lumbar support
Backrest tilt, head restraint
Adjusting the head restraint
Infotainment
Radio
Changing the entertainment source
CD/DVD drive
Eject CD/DVD
Changing the station/track
Programmable memory buttons
Sound output on/off, volume
Waveband/satellite radio
Navigation desti
SEE MORE:
KDS Chassis/Wheel Alignment Check With Vehicle Load Up To Design
Position
NOTE:
Note general notes and GENERAL DATA
Note GENERAL DRIVE TRAIN DEFINITION
Update KDS DATA VERSIONS
NOTE:
For vehicles with rear axle slip angle control (F01/F02/F07)
During measurement, move HSR actuator with BMW diagnosis system to
center position "0" (see Service function/Chassis
Tire inflation pressure- Tire inflation pressures up to 100 mph/160 km/h
For speeds of up to 100 mph/160 km/h and for
optimum driving comfort, note the pressure values
in the tire inflation pressure table and adjust
as necessary.
These pressure values can also be found on the
tire inflation pressure label on the driver's door
pillar.
Do not exceed a speed of 100 mph/1
