BMW 7 Series: Cover For Side Member At Rear (Rear Side Panel Removed)
Read contents of BODY, GENERAL.
Use only approved SPOT-WELDING APPARATUS for repairs.
The following new bodywork parts are required:
- Cover, side member, rear (component is included on new side panel part)
Removal
Open weld joints in area (1).
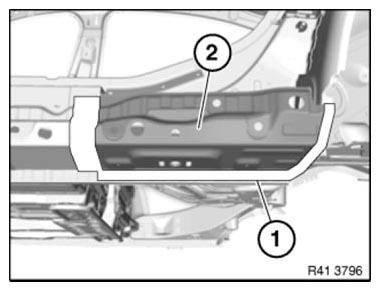
Fig. 357: Identifying Weld Joints Area
View from below: Open weld joint (1).
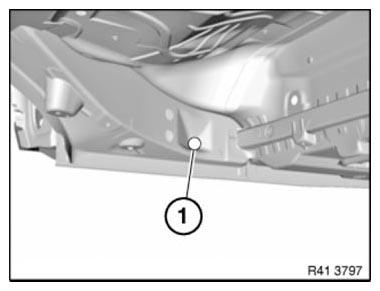
Fig. 358: Identifying Weld Joint
View from inside: Open weld joint (1).
Remove side member cover.
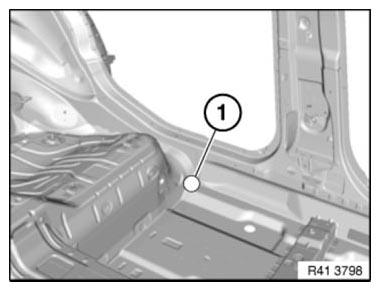
Fig. 359: Identifying Weld Joint
Preparation of new part
Detach side wall.
Open welded connections in area (1) and remove side member cover (2).
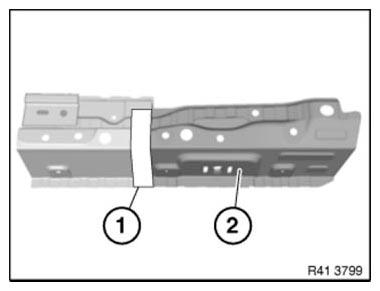
Fig. 360: Identifying Welded Connections Area And Side Member Cover
Installation
Install new part and weld.
NOTE: Apply repair welding spots in area of sill bottom edge to existing welding spots on new component/car. This is necessary because the adhesive between the spot flanges acts as an insulator.
READ NEXT:
 Reinforcement Plate With Stud Bolt (Bonded)
In the case of a partial replacement piece, a body component is cut at a
point described in the repair instructions.
A reinforcement plate is bonded in to ensure sufficient strength.
Reinforcement
Replacing Left Rear Side Wall
Read contents of BODY, GENERAL.
STRIP DOWN VEHICLE
Observe new procedure for bonding and riveting (REPAIR STAGE 2).
Following new body parts are required:
Side frame, rear
Reinforcement plate, C-
Replacing Outer Section Of Left Or Right Rear Wheel Housing (Side
Panel Removed)
Read contents of BODY, GENERAL.
Spot-weld bonding is used on this vehicle. Observe specific procedure See
SPOT-WELD BONDING
STEEL PARTS.
Remove or cover those vehicle components in the repair area
SEE MORE:
Safety Information For Working On Vehicles With Automatic Engine Start-Stop
Function (MSA)
WARNING: If the engine hood/bonnet contact is pulled upwards (workshop
mode),
the information "switch closed" is output. The automatic engine start-stop
function is active.
An automatic engine start is possible.
Observe safety precautions when working on MSA vehicles
Before carrying out practical
Removing Overrunning Equipment/Maintaining Or Replacing Guide
Bush/Installing Overrunning Equipment
After installing overrunning equipment, readjust brake system, refer to
ADJUSTING BRAKE SYSTEM
Check the guide bush while installed to ascertain whether it needs to be
replaced. Raise ball end area and
replace guide bush if play is detected in ball end area.
NOTE: After installing, readjust and ch
