BMW 7 Series: Venting Cooling System For Intercooler (N63)
Notes
WARNING: Danger of scalding! Open sealing cap only after engine has cooled down.
IMPORTANT: Cooling system for intercooler has a separate cooling circuit.
Coolant is added at intercooler expansion tank.
Electric coolant pump!
FOLLOW INSTRUCTIONS FOR WORKING ON COOLING SYSTEM.
IMPORTANT: Lifetime coolant filling:
Never reuse used coolant! When replacing and removing components which rely on the corrosion protection effect of the coolant, it is essential to change the coolant. The cooling system must therefore be drained and refilled.
In the case of other removal work involving the draining of partial quantities of coolant, replace these quantities which have been drained with new coolant.
IMPORTANT: Risk of slipping due to coolant on the floor.
Danger of injury!
Catch and dispose of drained coolant in drip tray (1) and if necessary special tool 00 2 030 (universal hydraulic lifter).
Recycling
Observe country-specific waste-disposal regulations.
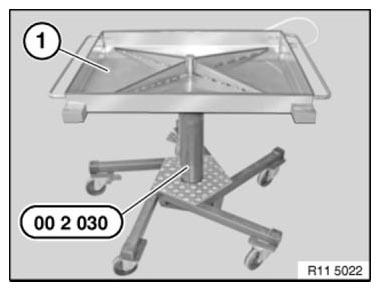
Fig. 27: Lifting Of Drip Tray Using Special Tool (00 2 030)
IMPORTANT: The following venting procedure is necessary when a part is replaced in the cooling system or when the cooling system is refilled.
Add coolant
Coolant is added at intercooler expansion tank.
Use only recommended coolant and observe mixture ratio.
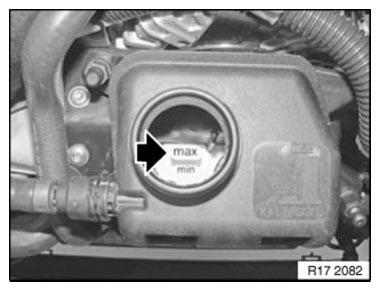
Fig. 28: Identifying Coolant Level
Venting cooling system
NOTE: Do not leave the coolant expansion tank cap open during the venting procedure.
1. Add coolant up to top edge of expansion tank. Coolant must not drop any further! No drop in coolant for approx. 1 minute.
2. Connect battery charger.
3. Switch on ignition.
4. Set heater to maximum temperature. Press "Automatic" button. Then reduce fan to lowest setting.
5. Press accelerator pedal for 15 seconds to floor. Engine must not be started.
6. The venting procedure is started when the accelerator pedal is pressed and takes approx. 12 minutes.
7. Refill expansion tank up to top edge immediately after drawing off until empty.
8. Adjust expansion tank to maximum level at end of venting process.
9. Check cooling system for leaks.
10. Close expansion tank.
11. If the venting procedure has to be carried out again, allow DME to drop completely (ignition key removed for approx. 3 minutes), then repeat from Point 5.
READ NEXT:
 Radiator, Expansion Tank, Pipes
CHECKING COOLING SYSTEM FOR WATERTIGHTNESS (N54, N63)
Notes
WARNING: Risk of scalding!
Only perform this repair work after engine has cooled down.
Protective measures/rules of conduct
Wear safety go
Removing And Installing Radiator (N63, N74)
WARNING: Risk of scalding!
Only perform this repair work after engine has cooled down.
IMPORTANT: Wear safety goggles and protective gloves.
Necessary preliminary tasks
Remove FAN COWL.
Drain COOLA
SEE MORE:
Removing And Installing (Replacing) Left Headlight - Led
Technology
Remove FRONT BUMPER TRIM
Vehicles with auxiliary radiator:
Remove FRONT WHEEL ARCH COVER
Lever out expanding rivets (1) on engine compartment lid seal (2).
Fig. 46: Identifying Expanding Rivets On Engine Compartment Lid Seal
Remove seal for engine compartment lid (2) on left.
Release screws (
Procedure After Airbag Triggering As Result Of An Accident
Check and/or replace following components after airbag triggering:
Satellites (control unit + sensor)
Components
Satellite, A-/B-pillar, left/right
Satellite, front door
Satellite, rear seat
Satellite, driver's/front passenger seat
Satellite, vehicle center
Procedure
Inspect visua
