BMW 7 Series: Radiator, Expansion Tank, Pipes
CHECKING COOLING SYSTEM FOR WATERTIGHTNESS (N54, N63)
Notes
WARNING: Risk of scalding! Only perform this repair work after engine has cooled down.
Protective measures/rules of conduct
- Wear safety goggles
- Wear protective gloves
- Observe national/country-specific regulations
IMPORTANT: Risk of skidding due to coolant on the floor.
Danger of injury!
Catch and dispose of drained coolant in drip tray (1) and if necessary special tool 00 2 030 (universal hydraulic lifting equipment).
Recycling
Observe country-specific waste disposal regulations.
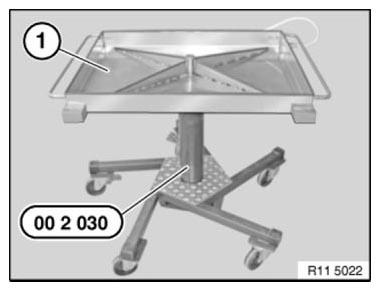
Fig. 29: Lifting Of Drip Tray Using Special Tool (00 2 030)
Checking pressure drop in cooling system
Open the sealing cap on the coolant expansion tank. Fit special tools (1) 17 0 101 and (2) 17 0 113.
Build up EXCESS PRESSURE , wait approx. 2 minutes.
Cooling system is impervious to watertightness if pressure drop is max. 0.1 bar.
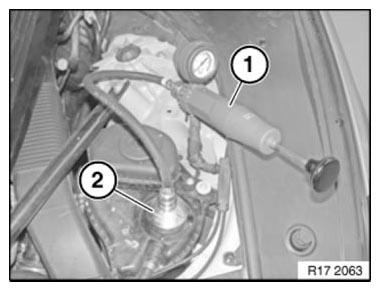
Fig. 30: Checking Pressure Drop In Cooling System Using Special Tools (17 0
101 And 17 0 113)
Checking pressure relief valve in sealing cap
NOTE: While the driving at high ambient temperatures, the design may cause the pressure relief valve in the sealing cap to open slightly and air together with dissolved coolant to escape. This coolant vapor condenses on the surface of the expansion tank and leaves toes when the vehicle has cooled down. These toes do not indicate whether the sealing cap is defective or not. When the vehicle has been in standstill for an extended period of time, the residual escaping coolant can cause the pressure relief valve in the sealing cap to stick; therefore repeat the test procedure for the sealing cap 2 to 3 times.
Replace the sealing cap only after you have checked three times and there is an incorrect opening pressure.
Checking pressure relief valve in sealing cap
Screw sealing cap (1) onto special tool 17 0 114.
Build up pressure with special tool (hand pump) 17 0 101; observe pressure gauge to ascertain when opening pressure is achieved.
Compare OPENING PRESSURE of pressure relief valve.
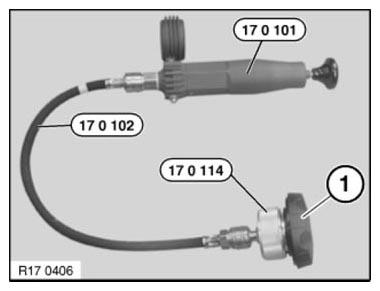
Fig. 31: Checking Pressure Relief Valve In Screw Cap Using Special Tool (17 0
114)
INSTRUCTIONS FOR REPLACEMENT OF AIR CONDITIONING CAPACITORS AND RADIATOR/COOLERS
IMPORTANT: Even when they are correctly installed or due to normal driving, coolers (oil cooler, radiator, charge air cooler) or air conditioning capacitors may show slight impressions or deformations on their discs (picture).
This is not damage.
Radiators, cooler or capacitors are not to be replaced in this case.
NOTE: The deformations shown in illustration "1" (see Fig. 32) can be bent back with a standard fin comb.
Damage to lines carrying media or on the flat pipe require replacement of the radiator/ or air conditioning condenser. Examples of such damage are shown in illustrations "2", "3", "4", "5", and "6" (see Fig. 32).
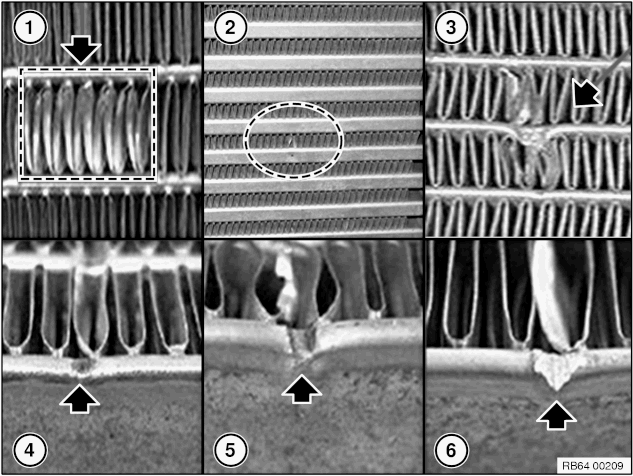
Fig. 32: Identifying Damage And Deformations
READ NEXT:
 Removing And Installing Radiator (N63, N74)
WARNING: Risk of scalding!
Only perform this repair work after engine has cooled down.
IMPORTANT: Wear safety goggles and protective gloves.
Necessary preliminary tasks
Remove FAN COWL.
Drain COOLA
Removing And Installing/Replacing Cooling Coil For Power Steering
(N63, N74)
WARNING: Danger of scalding!
Only perform this work after engine has cooled down.
IMPORTANT: When working on the oil and cooling circuit, protect the
alternator against
dirt/contaminants.
Cover alter
SEE MORE:
Danger Of Poisoning If Oil Is Ingested/Absorbed Through The Skin
Danger of poisoning!
Ingesting oil or absorbing through the skin may cause poisoning!
Possible symptoms are:
Headaches
Dizziness
Stomach aches
Vomiting
Diarrhoea
Cramps/fits
Unconsciousness
Protective measures/rules of conduct
Pour oil only into appropriately marked containers
Do not pou
Operating via the Controller
Opening the main menu
Press the button.
The main menu is displayed.
Selecting a menu
Selecting menu items
Turn the Controller until the desired menu
item is highlighted.
Press the Controller.
Select a widget
Move the Controller in the main menu to the
right.
Turn the Controller unti
