BMW 7 Series: V-Ribbed Belt W.Tens./Deflect
REPLACING A/C COMPRESSOR DRIVE BELT WITH BELT TENSIONER (N63)
IMPORTANT: Risk of damage! Release screws (1) on vibration absorber only if removal position is adjusted.
If contaminated with hydraulic fluid: Replace drive belt.
Crank engine at central bolt in direction of engine rotation.
Installation note: If the drive belt is to be reused, mark direction of travel and reinstall drive belt in same direction of rotation.
Necessary preliminary work
- Remove DRIVE BELT for alternator.
Observe direction of engine rotation
Crank engine at central bolt until marking (see arrow) is reached on vibration absorber.
Release screws (1).
Tightening torque 11 28 2AZ.
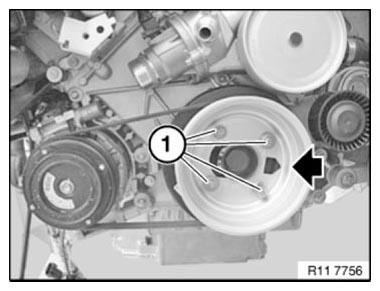
Fig. 189: Identifying Crank Pulley Screws And Marking
IMPORTANT: Belt pulley is pretensioned.
Belt pulley tension is relieved abruptly during the cranking process!
NOTE: Crank engine at central bolt until marking (see arrow) is reached on vibration absorber.
Remove elasto-belt.
Observe direction of engine rotation
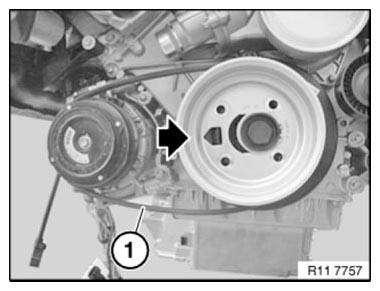
Fig. 190: Identifying Marking Reached On Vibration Absorber
Assemble engine.
REPLACING DRIVE BELT FOR ALTERNATOR (N63)
Notes
IMPORTANT: If contaminated with hydraulic fluid: Replace drive belt.
Installation note: If the drive belt is to be reused, mark direction of travel and reinstall drive belt in same direction of rotation.
Necessary preliminary work
- Remove FAN COWL.
- Release EXPANSION TANK for charge air cooler from mounting and press forwards.
Coolant hoses do not need to be released!
IMPORTANT: Belt tensioner is under high initial spring preload.
Slowly and carefully pre-tension belt tensioner (1) in direction of arrow up to stop.
Secure special tool 11 3 340 in dowel hole (2).
Belt tensioner in installation position.
Remove drive belt.
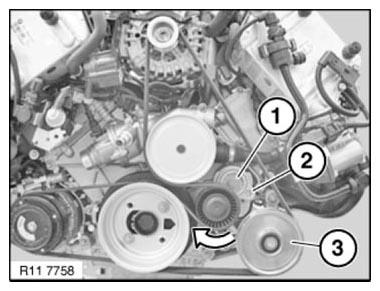
Fig. 191: Identifying Belt Tensioner Tensioning Direction
NOTE: On vehicles which do not have a power steering pump, a deflecting element (3) is fitted in place of the power steering pump.
IMPORTANT: Belt tensioner is under high initial spring preload.
Put on the drive belt.
Remove special tool 11 3 340 from dowel hole (2).
Slowly relieve tension on belt tensioner (1).
Installation note: Make sure drive belt is in correct installation position.
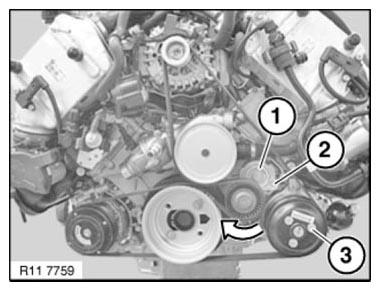
Fig. 192: Identifying Belt Tensioner Tensioning Direction
Assemble engine.
REPLACING TENSIONING DEVICE FOR ALTERNATOR DRIVE BELT (N63)
Necessary preliminary work
- Remove alternator DRIVE BELT
If necessary, remove special tool 11 0 390.
Release screw (1).
Tightening torque 11 28 1AZ.
Remove belt tensioner with idler pulley (2).
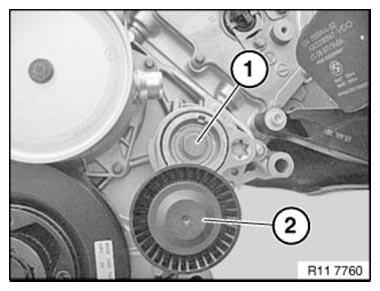
Fig. 193: Identifying Screw And Idler Pulley
READ NEXT:
 Adjusting Camshaft Timing On Left Side (N63)
Notes
IMPORTANT: Release central bolts on adjuster only with special tool 11 9
890.
Risk of damage to timing drive.
If special tool 11 9 890 can not be fitted, it is necessary when releasing the
ce
Adjusting Camshaft Timing On Right Side (N63)
Notes
IMPORTANT: Release central bolts on adjuster only with special tool 11 9
890.
Risk of damage to timing drive.
If special tool 11 9 890 can not be fitted, it is necessary when releasing the
ce
SEE MORE:
Screen Mirroring
General information
Screen Mirroring enables mirroring (outputting)
of the smartphone display on the Control Display.
Functional requirements
Compatible smartphone with Screen Mirroring
interface.
Compatible devices
Screen Mirroring is switched on on the
smartphone.
WLAN is switched on in the
Trunk lid
General information
To avoid locking the vehicle key in the vehicle,
do not place the vehicle key in the cargo area.
It may not be possible to open the trunk lid when
the vehicle is in valet parking mode.
Additional information:
Valet parking mode
Safety information
Warning
Body parts can be jamme
