BMW 7 Series: High beams, headlight flasher, turn signal
High beams, headlight flasher
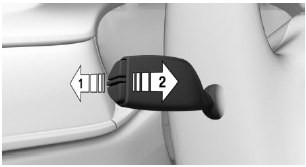
Push the lever forward or pull it backward.
- High beams on, arrow 1.
The high beams light up when the low beams are switched on.
- High beams off/headlight flasher, arrow 2.
Turn signal
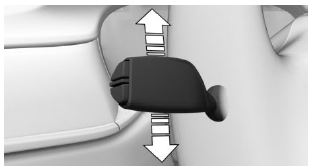
- On: press the lever past the resistance point.
- Off: press the lever past the resistance point in the opposite direction.
- Triple turn signal activation: lightly tap the lever up or down.
- Brief signaling: press the lever to the resistance point and hold it there for as long as you want the turn signal to flash.
Lights and lighting
Light functions
Symbol /Function
 Night vision.
 Lights off.
Daytime running lights.
 Parking lights.
 Automatic headlight control.
Adaptive light functions.
 Low beams.
 Instrument lighting.
 Right roadside parking light.
 Left roadside parking light.
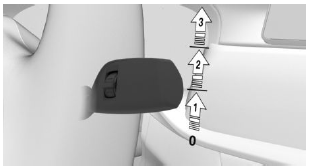
Wiper system
Switching the wipers on/off and brief wipe
Switching on
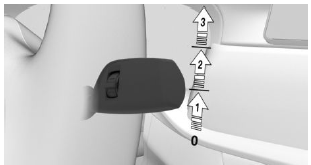
Press the lever up until the desired position is reached.
- Resting position of the wipers: position 0.
- Rain sensor: position 1.
- Normal wiper speed: position 2.
- Fast wiper speed: position 3.
Brief wipe and switching off
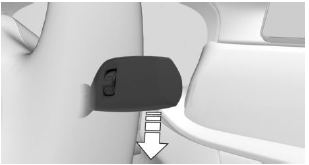
Press the lever down.
- Switching off: press the lever down until it reaches its standard position.
- Brief wipe: press the lever down from the standard position.
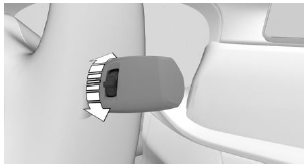
Rain sensor
Activating/deactivating
To activate: press the lever up once from its standard position, arrow 1.
To deactivate: press the lever back into the standard position.
Adjusting the sensitivity
Turn the thumbwheel on the wiper lever.
Cleaning the windshield
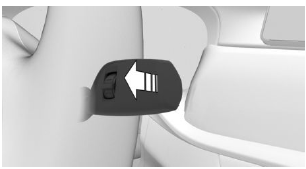
Pull the wiper lever towards you.
READ NEXT:
 Climate control
Automatic climate control
Symbol/ Function
Temperature.
Air conditioning.
Maximum cooling.
AUTO program.
Recirculated-air mode.
Air flow, manual.
Air distribution, manual.
SYNC program.
Defros
Providing assistance
Hazard warning flashers
The button is located in the center console.
Breakdown assistance
BMW Roadside Assistance
Via iDrive:
"APPS"
"Installed apps"
"BMW Assist"
If necessary, "BMW Roadside A
Controls
This chapter provides a thorough examination of the interior features of the car. It includes a broad range of functions and features intended to improve comfort, convenience, and safety while driving
SEE MORE:
Mobility System- Checking and adjusting the tire
inflation pressure
Checking
Switch off the compressor.
Read the tire inflation pressure on the tire
pressure gage.
To continue the trip, a tire inflation pressure of at
least 2 bar must be reached.
Removing and stowing the sealant
container
Unscrew the filling hose of the sealant container
from the tire
Unlocking/Locking Airbag Plug Connections
WARNING: READ AND COMPLY WITH safety regulations for handling airbag
modules
and pyrotechnical belt tensioners.
IMPORTANT: An airbag plug connection must be replaced if it is damaged.
Sourcing reference for airbag repair instructions (with plug connection), refer
to BMW Parts Service.
Following ve
