BMW 7 Series: Hands-Free System, Microphone, Speaker
REMOVING AND INSTALLING/REPLACING HANDS-FREE MICROPHONE, DRIVER'S SIDE
Lever out microphone cover (1) at front in direction of arrow.
Disconnect plug connection underneath and remove microphone cover (1).
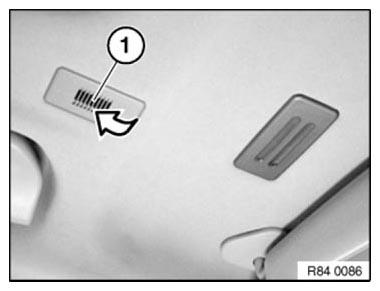
Fig. 13: Removing Microphone Cover
Unlock retaining lug (1) and feed out hands-free microphone (2) in direction of arrow.
Installation note: Arrow on hands-free microphone (2) points in direction of travel.
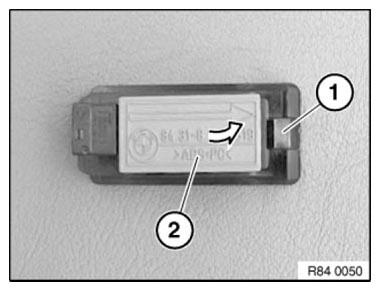
Fig. 14: Removing Hands-Free Microphone
IMPORTANT: Disconnecting the plug connection for the handsfree microphone or emergency call button results in fault memory entries in the telephone control unit (limitation in the emergency call system).
After fitting, read out fault memory and if necessary delete entries.
REMOVING AND INSTALLING/REPLACING HANDS-FREE MICROPHONE, PASSENGER SIDE
Operation is described in:
Removing HANDS-FREE MICROPHONE, DRIVER'S SIDE
REMOVING AND INSTALLING/REPLACING HANDS-FREE SYSTEM SPEAKER
Necessary preliminary work
- Remove trim panel for pedal assembly.
Disconnect plug connection (1).
If necessary, release cable straps from latch mechanisms (2).
Unlock latch mechanisms (2) and remove speaker (3) from mounting.
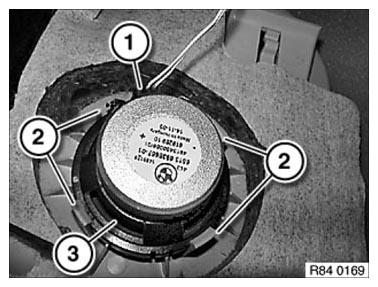
Fig. 15: Identifying Speaker, Latch Mechanisms With Plug Connection
Installation note:
Latch mechanisms (2) must not be damaged.
Guide lugs of mounting must be seated in grooves of speaker (3).
Speaker (3) must snap audibly into place in mounting.
READ NEXT:
 Antenna
REMOVING AND INSTALLING/REPLACING BLUETOOTH AERIAL (UP TO 03/2010)
Necessary preliminary tasks
Remove BOTH TRIM PANELS FOR ROOF PILLAR
Remove BOTH REAR GRAB HANDLES
Remove INTERIOR ROOF LIGHT
Rem
SEE MORE:
Front Trim Panel
Replacing Front Left Or Right Side Wall Holder
NOTE: Read CONTENTS OF BODY, GENERAL.
Side wall removed.
Transfer the systematic diagram onto the respective holder version.
NOTE: Observe REPAIR STAGE 2.
The following new body parts are required (refer to BMW Electronic Parts
Catalogue):
Holder,
Antilock Braking System
ABS
Vehicle features and
options
This chapter describes all standard, country-specific
and optional features offered with the series.
It also describes features and functions that are
not necessarily available in your vehicle, e.g., due
to the selected options or country versions. This
also applies to
