BMW 7 Series: Connecting Rod With Bearing
REPLACING ALL CONNECTING ROD BEARINGS (N63)
Notes
IMPORTANT: Note grinding stages on crankshaft.
Necessary preliminary work
- Removing all PISTONS
Install new connecting rod bearing shells.
Install one blue bearing shell (1) and one red bearing shell (2) in each connecting rod.
Install PISTON.
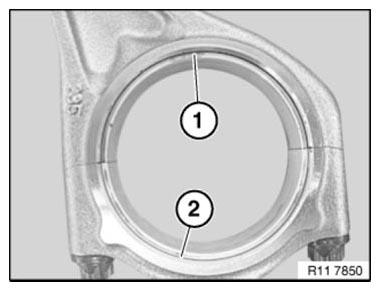
Fig. 148: Identifying Blue Bearing Shell And Red Bearing Shell
Installation note: The bearing shells on the connecting rod are coded.
Connecting rod bearing cap (1): the red bearing shell is fitted and the fastening notches are on the left and right sides of the bearing shell (see arrows).
Connecting rod (2): the blue bearing shell is fitted and the fastening notches are one side of the bearing shell (see arrows).
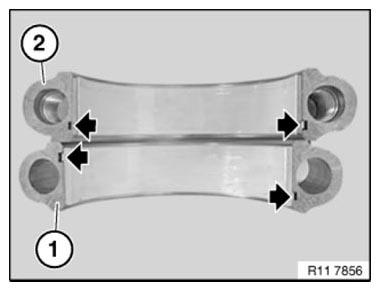
Fig. 149: Locating Red Bearing Shell Fastening Notches And Blue Bearing Shell
Fastening Notches
Check connecting-rod bearing play
Piston in BDC position.
Fit special tool 00 2 590 (Plastigage type PG 1) to oil-free crankshaft.
Fit bearing caps so that matching numbers match up.
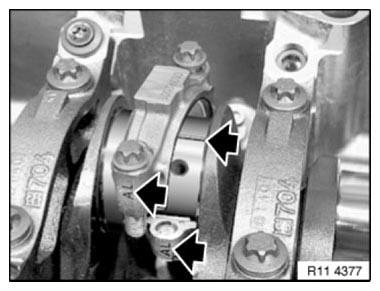
Fig. 150: Locating Special Tool 00 2 590
IMPORTANT: Do not distort connecting rods or crankshaft.
Use connecting rod bolts to check connecting-rod bearing play.
Connecting rod bolts with special tool 00 9 120.
Tightening torque 11 24 1AZ.
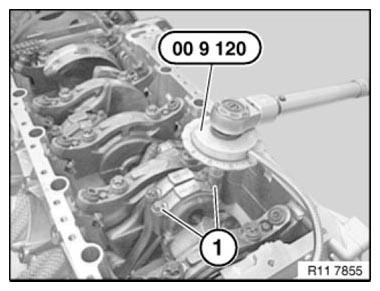
Fig. 151: Checking Connecting-Rod Bearing Play
Remove bearing cap and read off bearing play at width of flattened plastic thread with assistance of measuring scale.
CONNECTING-ROD BEARING PLAY.
- Remove plastic thread.
- Lubricate crankshaft and bearing shells.
- Install new connecting rod bolts.
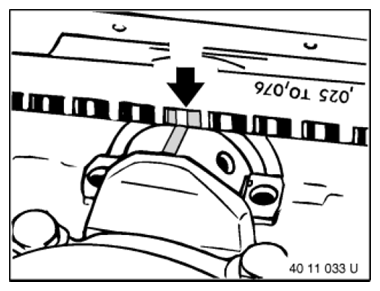
Fig. 152: Checking Connecting-Rod Bearing Play
Secure connecting rod bolts with special tool 00 9 120.
Tightening torque 11 24 1AZ.

Fig. 153: Securing Connecting Rod Bolts With Special Tool 00 9 120
Assemble engine.
READ NEXT:
 Removing And Installing/Replacing All Pistons (N63) Up To 3/2011
Notes
WARNING: Protective goggles must be worn when working on the gudgeon
pin circlip.
IMPORTANT: If pistons and connecting rods are reused, they must be
reinstalled in the same
places.
Piston and
Removing And Installing/Replacing All Pistons (N63) From 3/2011
Notes
WARNING: Protective goggles must be worn when working on the gudgeon
pin
circlip.
IMPORTANT: If pistons and connecting rods are reused, they must be
reinstalled in the same
places.
Piston and
SEE MORE:
Rocker Arm With Bearing Mount
REMOVING AND INSTALLING/RENEWING ROCKER ARMS ON RIGHT SIDE (N63)
Necessary preliminary work
(cylinder bank 1 to 4)
Remove INLET AND EXHAUST ADJUSTMENT UNIT on right side.
Remove right INLET CAMSHAFT.
Remove right EXHAUST CAMSHAFT.
IMPORTANT: Used rocker arms (1) may only be reused in the same p
SDARS Satellite Tuner
The SDARS (Satellite Digital Audio Radio Service) control unit enables
reception of digital radio signals.
Digital transmissions are superior in quality to analog transmissions. The radio
stations of the satellite tuner can
be selected under the "Satellite radio" submenu.
Advantages of digital s
