BMW 7 Series: Checking Cooling System For Watertightness (N54, N63)
Notes
WARNING: Risk of scalding! Only perform this repair work after engine has cooled down.
Protective measures/rules of conduct
- Wear safety goggles
- Wear protective gloves
- Observe national/country-specific regulations
IMPORTANT: Risk of skidding due to coolant on the floor.
Danger of injury!
Catch and dispose of drained coolant in drip tray (1) and if necessary special tool 00 2 030 (universal hydraulic lifting equipment).
Recycling
Observe country-specific waste disposal regulations.
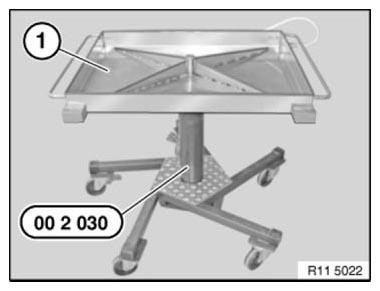
Fig. 1: Lifting Drip Tray Using Special Tool (00 2 030)
Checking pressure drop in cooling system
Open the sealing cap on the coolant expansion tank. Fit special tools (1) 17 0 101 and (2) 17 0 113.
Build up EXCESS PRESSURE , wait approx. 2 minutes.
Cooling system is impervious to watertightness if pressure drop is max. 0.1 bar.
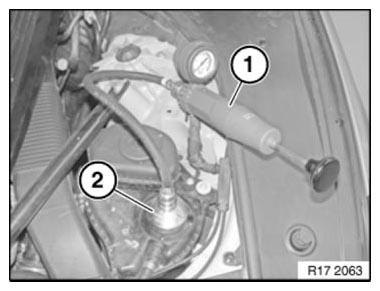
Fig. 2: Checking Pressure Drop In Cooling System Using Special Tools (17 0
101 And 17 0 113)
Checking pressure relief valve in sealing cap
NOTE: While the driving at high ambient temperatures, the design may cause the pressure relief valve in the sealing cap to open slightly and air together with dissolved coolant to escape. This coolant vapor condenses on the surface of the expansion tank and leaves toes when the vehicle has cooled down. These toes do not indicate whether the sealing cap is defective or not. When the vehicle has been in standstill for an extended period of time, the residual escaping coolant can cause the pressure relief valve in the sealing cap to stick; therefore repeat the test procedure for the sealing cap 2 to 3 times.
Replace the sealing cap only after you have checked three times and there is an incorrect opening pressure.
Checking pressure relief valve in sealing cap
Screw sealing cap (1) onto special tool 17 0 114.
Build up pressure with special tool (hand pump) 17 0 101; observe pressure gauge to ascertain when opening pressure is achieved.
Compare OPENING PRESSURE of pressure relief valve.
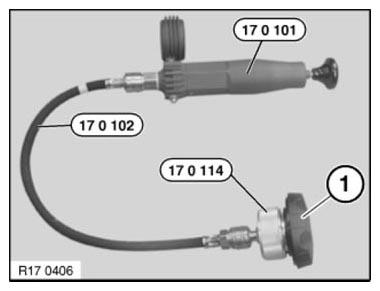
Fig. 3: Checking Pressure Relief Valve In Screw Cap Using Special Tool (17 0
114)
READ NEXT:
 Draining And Adding Coolant (N63)
Notes
WARNING: Risk of scalding!
The repair work on the cooling system should only be carried out on an
engine that has cooled down!
IMPORTANT: Lifetime coolant filling:
Never reuse used coolant!
When
Instructions For Working On Cooling System
WARNING: Danger of scalding! Work on the cooling system should only be
carried
out when the engine has cooled down.
IMPORTANT: Wear protective gloves and safety goggles.
IMPORTANT: Lifetime coolant f
Venting And Filling Cooling System With Vacuum Filling Unit
Notes
IMPORTANT: Lifetime coolant filling:
Never reuse used coolant!
When replacing and removing components which rely on the corrosion
protection effect of the coolant, it is essential to change the
SEE MORE:
Replacing Engine Support In Front Of Wheel Arch, Left
Observe procedure of REPAIR STAGE 3.
Read CONTENTS OF BODY, GENERAL.
Steel-aluminium composite construction is used on the vehicle.
Observe specific procedures for OPENING ADHESIVE BONDS, BONDING ALUMINIUM ON
STEEL,
and OPENING RIVETED JOINTS.
Use only approved spot-welding apparatus for repair
System Functions
The mobile phone must always be activated, paired and present within the
Bluetooth network in order to
place or receive a call through the vehicle.
Indicator Lamps
The indicator lamps show the following:
Fig. 12: Identifying Indicator Lamps
Active call (green light).
No mobile phone in range (ste
