BMW 7 Series: Assisted Driving View
Concept
With active driving assistance, the assist system displays information using figures in the instrument cluster.
General information
Depending on the settings, Assisted Driving View can be displayed permanently or temporarily with active driving assistance in the instrument cluster.
Safety information
.gif) Warning
Warning
The system cannot serve as a substitute for the driver's personal judgment in assessing visibility and traffic situation. There is a risk of accident.
Adjust driving style to traffic conditions. Watch traffic closely and actively intervene where appropriate.
Adjusting
Permanent display
Via iDrive:
- "CAR"
- "Settings"
- "Displays"
- "Instrument panel"
- "Central display area"
- "Assisted Driving View"
Temporary display
Via iDrive:
- "CAR"
- "Settings"
- "Displays"
- "Instrument panel"
- "Display Assisted Driving View when Driver Assistance is active"
Display
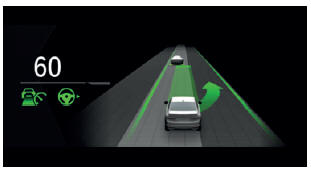
Example: the indicator/warning lights for the Active Cruise Control with Stop & Go function ACC and the Lane Change Assistant indicate a lane change to the next lane. At the same time, the lane change to the next lane is shown with animation in the Assisted Driving View.
System limits
The system's detection potential is limited.
Only objects that are detected by the system are taken into account.
READ NEXT:
 Widgets in the instrument
cluster
Widgets in the instrument
cluster
Concept
Displays for specific functions can be displayed
in the instrument cluster.
The following displays can be selected:
Current entertainment source, e.g., radio.
Torque and power.
Accelerati
Check Control
Concept
The Check Control system monitors functions in
the vehicle and notifies you of malfunctions in
the monitored systems.
General information
A Check Control message is displayed as a combination
Indicator/warning lights
Concept
Indicator/warning lights in the instrument cluster
display the status of some functions in the vehicle
and indicate when a malfunction is present in
the monitored systems.
General information
SEE MORE:
Voice activation system- Adjusting
Setting the language
The language to be used for voice activation and
system announcements can be set.
Via iDrive:
"CAR"
"Settings"
"General settings"
"Language"
"System language"
Select the desired language.
Setting the voice dialog
You can set the system to u
Installing child restraint
systems
General information
Pay attention to the specifications and the operating
and safety information of the child restraint
system manufacturer when selecting, installing,
and using child restraint systems.
Safety information
Warning
The protective effect of child restraint systems
and their fastening
