BMW 7 Series: Adjusting Engine Compartment Lid
IMPORTANT: The BATTERY NEGATIVE LEAD must be clamped off on vehicles with AFGS active pedestrian protection! Do not damage adjoining body components! Minor corrections (realignment work) are permitted if the existing adjustment options are not sufficient.
Carry over schematic representation to the relevant vehicle type.
NOTE: Observe GAP DIMENSIONS.
NOTE: Stop screw must not be damaged or missing. If necessary, replace hood/boot hinge.
The stop screw is preset and must not be used to adjust the hood/bonnet!
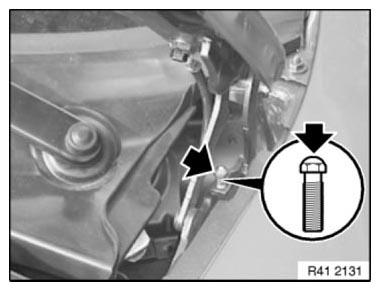
Fig. 406: Locating Stop Screw
Slacken nuts (1) of hinges on left and right.
Hood lid must be able to be moved.
Tightening torque 41 61 1AZ.
NOTE: If adjustment range is not sufficient, slacken screws on body and slide hinge.
(Refer to operation: Height adjustment at hinge)
Tightening torque 41 61 3AZ.
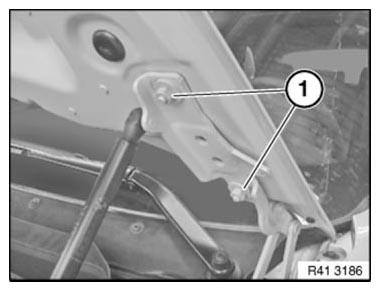
Fig. 407: Identifying Hinges Nuts
Adjust engine hood/bonnet sideways and lengthways.
Retaining hooks must snap into place in locks.
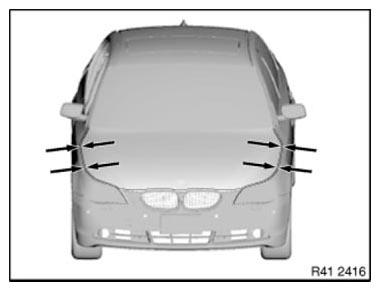
Fig. 408: Locating Engine Hood/Bonnet Adjustment Area
Height adjustment at hinge
Slacken screws (1) and adjust engine hood/bonnet.
Tightening torque 41 61 3AZ.
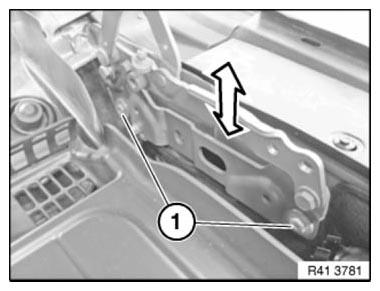
Fig. 409: Adjusting Hinge
Height adjustment at retaining hooks
Adjust height by turning nut (1).
Height adjustment of engine hood/bonnet to side panel by means of STOP BUFFERS.
NOTE: The engine hood/bonnet is correctly adjusted in the front area by a combination of pulling the arrester hooks and pressing the stop buffers.
Incorrect adjustment results in either wobbling of the engine hood/bonnet or sluggish unlocking.
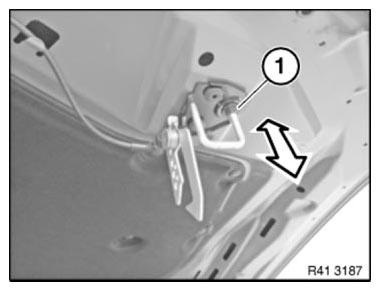
Fig. 410: Adjusting Height Using Turning Nut
IMPORTANT: Check function of arrester hook.
After installation
- Tighten all screws and nuts to specified torque.
- Touch up unpainted surfaces in the appropriate color.
- If necessary, adjust front side panels.
READ NEXT:
 Check Actuator
Necessary preliminary tasks
REMOVE ACTUATOR
Check actuator for damage.
ACTUATOR CHART
Fig. 411: Checking Actuator
CHECK HINGE FOR ENGINE COMPARTMENT LID
Necessary preliminary tasks
REMOVE HINGE
Removing And Installing Engine Compartment Lid
WARNING: Danger of injury!
Support engine compartment lid in fully opened position with suitable
apparatus.
IMPORTANT: These instructions only apply to vehicles without active
pedestrian protection !
SEE MORE:
Removing And Installing/Replacing Top Left Wishbone
Notes
NOTE: Wishbones with + or - marking (see graphic) are camber correction
arms:
- Underdimension variant
+ Overdimension variant
These camber correction arms are used to correct the camber values by 30
minutes. To be used only if the tolerance values are exceeded or undershot!
An unmarked contr
Conducting Leak Test On Fuel Tank And Tank Venting System
IMPORTANT: On vehicles with tank leak diagnosis modules (DMTL), do not
work with
external pressurization as the tank ventilation system will leak under this
condition.
On account of emerging fuel vapors, carry out all work in well ventilated rooms.
Or use a suitable extractor system.
Observe cou
