BMW 7 Series: Check Actuator
Necessary preliminary tasks
- REMOVE ACTUATOR
Check actuator for damage.
ACTUATOR CHART

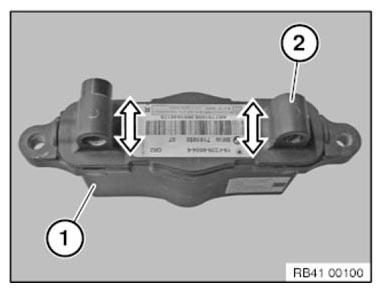
Fig. 411: Checking Actuator
CHECK HINGE FOR ENGINE COMPARTMENT LID
Necessary preliminary tasks
- REMOVE HINGE FOR ENGINE COMPARTMENT LID
Open and close hinge (1).
Place hinge (1) on a level surface. Check holes (2) for parallelism with surface.
HINGE CHART

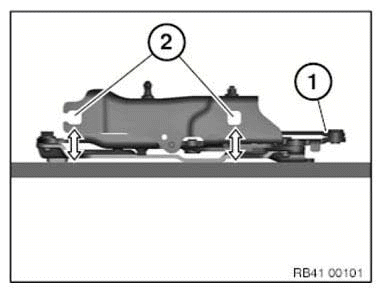
Fig. 412: Checking Hinge Holes For Parallelism With Surface
CHECKING HOOD/BONNET LOCKS
Necessary preliminary tasks
- Remove hood/bonnet locks.
Check hood/bonnet locks for damage; replace if necessary.
HOOD/BONNET LOCKS CHART


Fig. 413: Identifying Hood/Bonnet Lock Retaining Tabs And Spring
READ NEXT:
 Removing And Installing Engine Compartment Lid
WARNING: Danger of injury!
Support engine compartment lid in fully opened position with suitable
apparatus.
IMPORTANT: These instructions only apply to vehicles without active
pedestrian protection !
Adjusting Tailgate
IMPORTANT: Do not damage adjoining body parts.
Minor corrections (realignment work) are permitted if the existing adjustment
options are not sufficient.
Read contents of BODY, GENERAL.
Observe GAP D
SEE MORE:
Stationary Wheel Balancing
Necessary preliminary work
Remove WHEEL
IMPORTANT: Use only BMW-approved balance weights.
Remove any fitted balancing weights, stones in tread pattern and larger
contaminants.
Check tire inflation pressure and tire for condition, damage, flat spots
(out-of-round caused by e.g. parking of
vehic
Introduction
History
Voice-activated control was offered for the first time as an option for the
E38. The system enabled the driver to
operate the telephone and the navigation system without taking his or her eyes
off the road and the traffic situation.
As the voice recognition system evolved, the number of s
© 2019-2026 Copyright www.bmw7g11.com
