BMW 7 Series: Transceiver, Handset+Support, Card Reader
REMOVING AND INSTALLING/REPLACING TELEMATIC CONTROL UNIT (TCU) (SA633/SA639)
IMPORTANT: Read and comply with notes on protection against electrical damage (ESD PROTECTION).
NOTE: Comply with notes and instructions on HANDLING OPTICAL WAVEGUIDES.
Necessary preliminary tasks
- Clamp off BATTERY NEGATIVE LEAD
- Remove LEFT LUGGAGE COMPARTMENT WHEEL ARCH TRIM
- Partially remove wheel arch panel left at F10
Unscrew nuts (1).
Release screw (2).
Remove TCU holder (3) in direction of arrow.
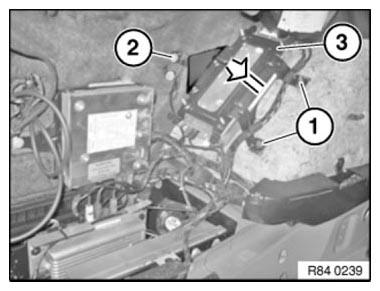
Fig. 7: Removing TCU Holder
Unlock plug connections (1) and disconnect.
Unfasten aerial plug (2) and disconnect.
Release all nuts.
Remove TCU (3) from holder (4).
Installation: Observe color coding of aerial plugs (2).
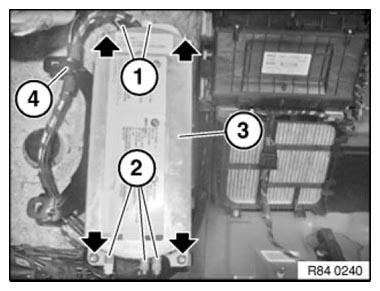
Fig. 8: Identifying Plug Connections, Aerial Plug With TCU And Holder
Replacement
- Carry out VEHICLE PROGRAMMING/ENCODING
REMOVING AND INSTALLING/REPLACING HANDS-FREE MICROPHONE, DRIVER'S SIDE
Lever out microphone cover (1) at front in direction of arrow.
Disconnect plug connection underneath and remove microphone cover (1).
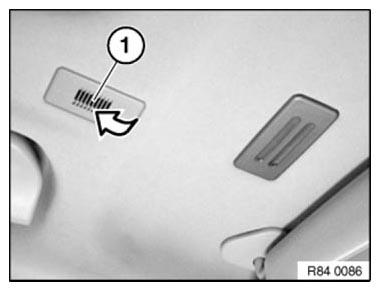
Fig. 9: Removing Microphone Cover
Unlock retaining lug (1) and feed out hands-free microphone (2) in direction of arrow.
Installation note: Arrow on hands-free microphone (2) points in direction of travel.
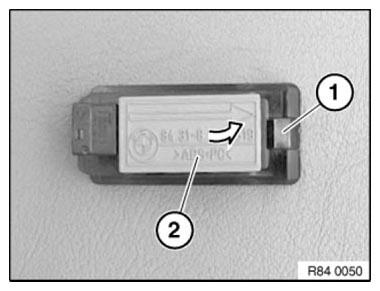
Fig. 10: Removing Hands-Free Microphone
IMPORTANT: Disconnecting the plug connection for the handsfree microphone or emergency call button results in fault memory entries in the telephone control unit (limitation in the emergency call system).
After fitting, read out fault memory and if necessary delete entries.
REMOVING AND INSTALLING/REPLACING HANDS-FREE MICROPHONE, PASSENGER SIDE
Operation is described in:
Removing HANDS-FREE MICROPHONE, DRIVER'S SIDE
READ NEXT:
 Handheld Computer
REMOVING AND INSTALLING (REPLACING) HANDSFREE CHARGING
ELECTRONICS (HIGH)
Operation is described in:
REMOVING AND INSTALLING (REPLACING) HANDSFREE CHARGING ELECTRONICS
(OPTIONAL EXTRA SA644)
Replaceme
Hands-Free System, Microphone, Speaker
REMOVING AND INSTALLING/REPLACING HANDS-FREE MICROPHONE, DRIVER'S
SIDE
Lever out microphone cover (1) at front in direction of arrow.
Disconnect plug connection underneath and remove microphone cover
Antenna
REMOVING AND INSTALLING/REPLACING BLUETOOTH AERIAL (UP TO 03/2010)
Necessary preliminary tasks
Remove BOTH TRIM PANELS FOR ROOF PILLAR
Remove BOTH REAR GRAB HANDLES
Remove INTERIOR ROOF LIGHT
Rem
SEE MORE:
Indicator/warning lights- Yellow lights
Steering and traffic jam assistant
The indicator light lights up
and an
acoustic signal may sound: a system interruption
is imminent.
The indicator warning light flashes: lane marking
driven over.
Additional information:
Steering and Lane Control Assistant
Antilock Braking System ABS
The Brake As
Zero Position Sensor
The zero position of the swivel module with respect to the zero position
sensor is detected by a 1/0 edge when
swivelling from the direction of the off position in the direction of the
optical axis. The swivel module is
repeatedly calibrated during operation based on this "soft" reference point.
