BMW 7 Series: Replacing Luggage Compartment Floor, Left Section (Tail Panel Or Side Wall Removed)
Read contents of BODY, GENERAL.
STRIP DOWN VEHICLE
NOTE: Observe new procedure for bonding and riveting (REPAIR STAGE 2).
Following new body parts are required (refer to Electronic Parts Catalogue - EPC):
- Luggage compartment floor, left Following consumables are required:
MATERIAL CHART

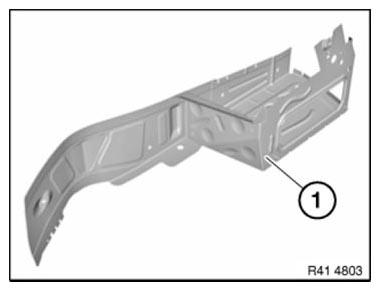
Fig. 338: Identifying Luggage Compartment Floor, Left
Removal of luggage compartment floor
For purposes of clarity, graphic shows most of the tail panel removed.
Open welded connections in area (1).
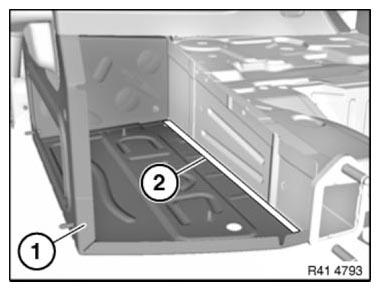
Fig. 339: Identifying Welded Connections Area And Luggage Compartment Floor
Open welded connections in area (1).

Fig. 340: Identifying Welded Connections Area
Open welded connections in area (1).
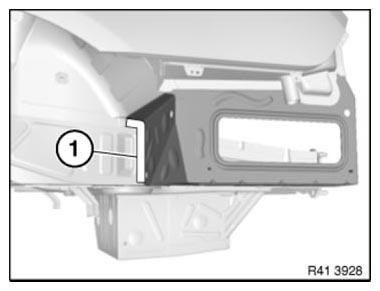
Fig. 341: Identifying Welded Connections Area
Separate welded connections in area (1) from inside.
Remove the luggage compartment floor.
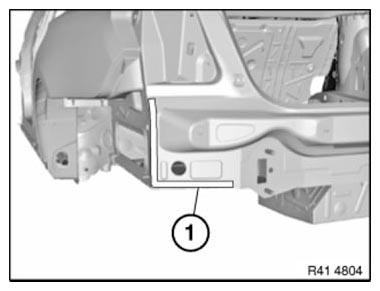
Fig. 342: Identifying Welded Connections Area
New part preparation
Open welded connections in area (1).

Fig. 343: Identifying Welded Connections Area
Open welded connections in area (1).
Remove metal section (2).
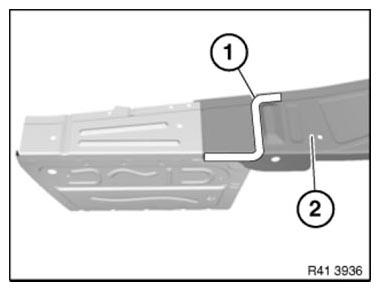
Fig. 344: Identifying Welded Connections Area And Metal Section
Adjust and secure the luggage compartment floor (1).
Set 5 4.2 mm dia. bore holes in area (2).

Fig. 345: Identifying Luggage Compartment Floor And Bore Holes Area
Set 3 4.2 mm dia. bore holes in area (1).

Fig. 346: Identifying Bore Holes Area
Set 11 4.2 mm dia. bore holes in area (1).
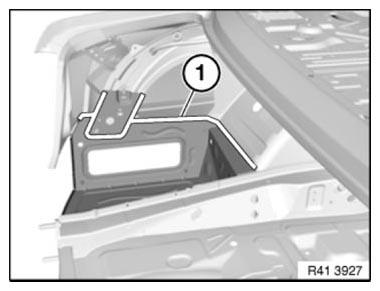
Fig. 347: Identifying Bore Holes Area
Set six 4.2 mm dia. bore holes in area (1).
Remove new parts and deburr bore holes.

Fig. 348: Identifying Bore Holes Area
IMPORTANT: Do not grind new part and body in area of bonding surfaces.
Installation of luggage compartment floor
Clean all bonding surfaces on new part and on vehicle with cleaning agent R1.
Apply adhesive on all bonding and riveting surfaces.
Install new part and rivet with blind rivets.
When installing the new part, make sure that all bonding surfaces have sufficient adhesive.
READ NEXT:
 Replacing Rear Cross Member On Luggage Compartment Floor (Tail
Panel Removed)
Replacing Rear Cross Member On Luggage Compartment Floor (Tail
Panel Removed)
Read contents of BODY, GENERAL.
STRIP DOWN VEHICLE
Observe new procedure for bonding and riveting (REPAIR STAGE 2).
Following new body parts are required:
End of luggage compartment floor
Followi
Stripping Operations - Replacing Rear Left Side Panel
NOTE: Owing to the different engine variants and equipment specifications,
not all the
components are taken into consideration.
The following list basically represents the removal sequence.
Clamp o
SEE MORE:
Removing And Installing Steering Column Switch Cluster
WARNING: Move wheels into straight-ahead position and do not alter this
position
during the repair work.
Do not under any circumstances turn the steering column switch cluster
when the steering wheel is removed.
Necessary preliminary work
Remove steering wheel.
Unclip steering column shroud upp
Removing And Installing/Replacing Top Left Wishbone
Notes
NOTE: Wishbones with + or - marking (see graphic) are camber correction
arms:
- Underdimension variant
+ Overdimension variant
These camber correction arms are used to correct the camber values by 30
minutes. To be used only if the tolerance values are exceeded or undershot!
An unmarked contr
