BMW 7 Series: Radio
OVERVIEW OF AUDIO COMPONENTS
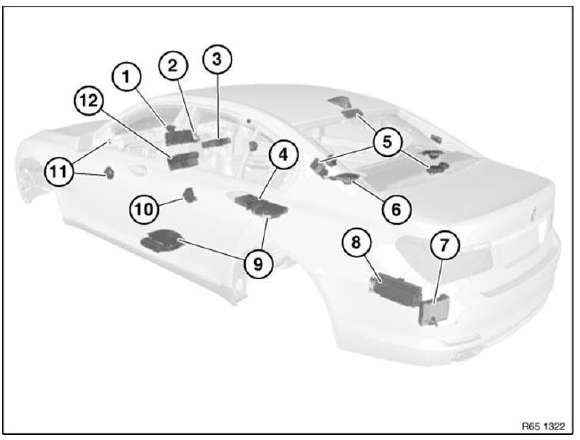
Fig. 1: Overview Of Audio Components (1 Of 2)
- Speaker (in dashboard)
- Central Information Display (CID)
- DVD changer
- DVD player, rear console
- Aerial diversity
- Speaker (in storage shelf)
- Satellite tuner
- Amplifier
- Central bass speaker
- Speaker (door, rear)
- Speaker (door, front)
- Car Information Computer (CIC)
Mono Radio
OVERVIEW OF AUDIO COMPONENTS
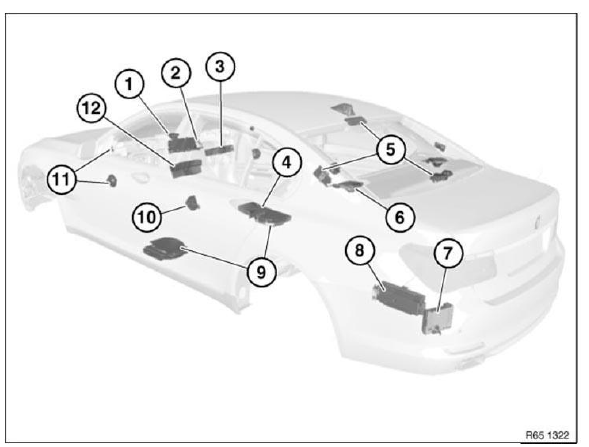
Fig. 2: Overview Of Audio Components (2 Of 2)
- Speaker (in dashboard)
- Central Information Display (CID)
- DVD changer
- DVD player, rear console
- Aerial diversity
- Speaker (in storage shelf)
- Satellite tuner
- Amplifier
- Central bass speaker
- Speaker (door, rear)
- Speaker (door, front)
- Car Information Computer (CIC)
REMOVING AND INSTALLING/REPLACING DVD CHANGER
IMPORTANT: Read and comply with NOTES on protection against electrostatic damage (ESD protection).
NOTE: Comply with notes and instructions on HANDLING OPTICAL FIBRES.
Necessary preliminary tasks
- F01/02: DISCONNECT BATTERY EARTH CABLE.
- F03: Disconnect both battery earth cables.
- Remove DECORATIVE STRIP ON STORAGE COMPARTMENT/DVD CHANGER INSTRUMENT PANEL.
NOTE: Affects all vehicles from series introduction to 09/2009 with DVD changer (SA696)!
When a new DVD changer (2) is being replaced (as of 09/09) , conversion to ISTA/P must be carried out.
("Converting replacement DVD changer ") If the old DVD changer (1) is installed (up to 09/09 ), this conversion to ISTA/P must not be carried out.
The old DVD changer (1) and the DVD changer (2) have an external difference in that the Load and Eject buttons are swapped round.
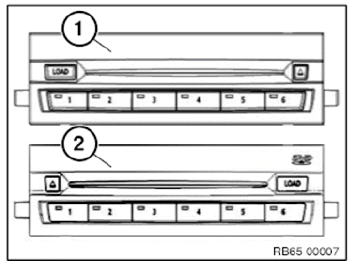
Fig. 3: Identifying New DVD Changer
Unclip trims (1) with a suitable tool and release screws behind.
Pull DVD changer (2) out of guide.
Unlock associated plug connection (3) and disconnect.
Remove DVD changer (2).
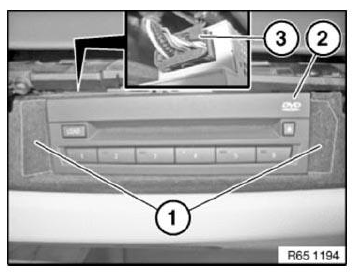
Fig. 4: Identifying Unclip Trims, DVD Changer And Plug Connection
Replacement: Carry out VEHICLE PROGRAMMING/CODING.
REPLACING AUDIO UNIT
IMPORTANT: Read and comply with notes on protection against electrostatic damage (ESD PROTECTION).
IMPORTANT: Use of supplied gloves is mandatory Carry out installation in a dust-free workshop area only.
To avoid damage, do not touch or dirty the display field.
Necessary preliminary work
- Remove RADIO AND IHKA CONTROLS
IMPORTANT: Retrofitting must only be done in the supplied installation cassettes.
Use of supplied gloves is mandatory, so that there is no damage to the display.
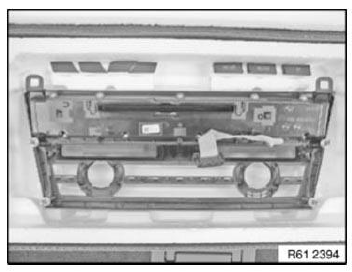
Fig. 5: Identifying Radio And IHKA Controls
Installation note: Modify IHKA CONTROLS on new audio unit.
Replacement
Carry out VEHICLE PROGRAMMING/ENCODING.
READ NEXT:
 Removing And Installing (Replacing) Head Unit
IMPORTANT: Risk of damage!
There is a hard disk installed in the head unit.
Carry out mechanical work on the head unit and adjacent components with
care.
Avoid subjecting the head unit to vibration/
Removing And Installing/Renewing Central Bass Speaker-Driver's Side- (Under
Front Seat)
Necessary preliminary tasks
Remove FRONT SEAT, DRIVER'S SIDE
Remove PANEL FOR DOOR PILLAR.
Pull trim (1) in direction of arrow towards rear and lift out.
Fig. 12: Identifying Trim
Release plastic
SEE MORE:
Tire pressure monitor- System limits
Temperature
The tire inflation pressure depends on the tire's
temperature.
Driving or exposure to the sun will increase the
tire's temperature, thus increasing the tire inflation
pressure.
The tire inflation pressure is reduced when the
tire temperature falls again.
These circumstances may cause
Replacing Actuator Drive For Right Footwell Flap
Necessary preliminary tasks
Remove INSTRUMENT PANEL TRIM
Position of actuator drive:
OVERVIEW OF ACTUATOR DRIVES ON HEATER/AIR CONDITIONER
Release screws (1).
Take off holder (2).
Fig. 73: Identifying Holder And Screws
Unclip connector piece (1) and slide downwards.
Latching of connector piece
