BMW 7 Series (F01/F02) 2008-2015 Service Manual / Audio, Navigation And Anti-Theft / Anti-Theft Alarm System
BMW 7 Series: Anti-Theft Alarm System
REMOVING AND INSTALLING/REPLACING EMERGENCY POWER SIREN WITH TILT SENSOR
Necessary preliminary work
- Remove GUIDE FOR BUMPER AT REAR RIGHT
Secure guide for bumper (3) against falling out.
Unfasten plug connection (1) and disconnect.
Slacken nut (1).
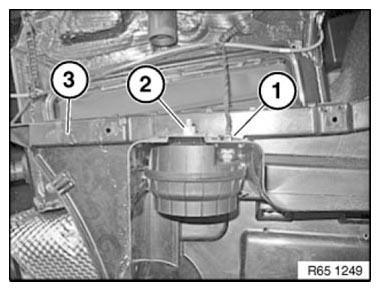
Fig. 93: Identifying Bumper, Plug Connection And Slacken Nut
Unlock catch (1).
Remove emergency power siren (2) from guide for bumper (3).
Catch (1) must not be damaged.
Make sure emergency power siren (2) is correctly seated on guide for bumper (3).
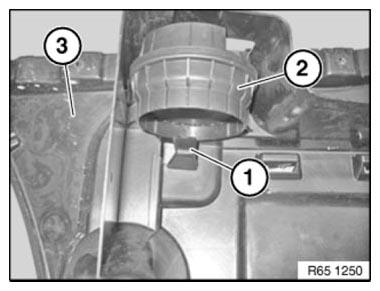
Fig. 94: Identifying Catch And Power Siren
Replacement
Carry out VEHICLE PROGRAMMING/ENCODING.
READ NEXT:
 Pedestrian Protection
REMOVING AND INSTALLING (REPLACING) LEFT PEDESTRIAN PROTECTION
SENSOR
WARNING: Observe SAFETY INSTRUCTIONS for handling gas generators.
Incorrect handling can activate pedestrian protection and cause
Overview Of Aerial Diversity
Fig. 101: Overview Of Aerial Diversity
Aerial amplifier
Blocking circuit
AM choke (US vehicles only)
Back - up aerial
Interference suppression filter
OVERVIEW OF SENSORS FOR AIRBAG SYSTEM AND
SEE MORE:
Butt Connector For Repairing A Plug Connection
Notes
IMPORTANT:
Identify cause of damage (e.g. sharp-edged body parts, faulty
electrical
loads, jammed mechanisms, corrosion caused by ingress of water, etc.).
Read out fault memory
Eliminate cause of damage.
Disconnect battery negative terminal
Make sure that no safety-related system acco
Fog Lights, Auxiliary Lights
REMOVING AND INSTALLING (REPLACING) LEFT HEADLIGHT FOR TARGET
ILLUMINATION
NOTE: The time value of this job item does not include adjustment of the
headlight for
target illumination!
ADJUSTMENT OF HEADLIGHT FOR TARGET ILLUMINATION must be carried out after
removal
and installation!
IMPORTANT: Foll
© 2019-2026 Copyright www.bmw7g11.com
